

| You are here: Home » Import CAD Formats » NGRAIN's 3KO Solutions |
Support: 905-672-9328 Copyright © 2024 Okino Toronto, Ontario, Canada. |
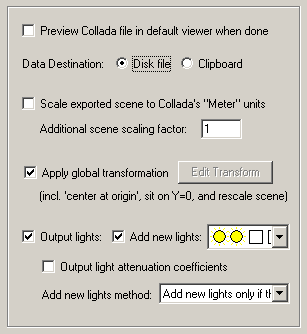
Preview COLLADA File in Default Viewer When Done
If this checkbox is checkmarked then the exported COLLADA file will be sent to the Windows Shell where it will start up your default COLLADA viewer to view the file. This option will only work if you have a COLLADA file viewer installed on your computer and it has been associated with the .dae file extension.Data Destination: Disk File or Clipboard
These two radio buttons determine if the final COLLADA file will be written to disk or copied to the clipboard.Scale exported scene to COLLADA's 'Meter' Units
If this checkbox is checkmarked then the file will be output using a <unit> definition of:<unit meter="1.0" name="meters" />and all exported geometry, lights and camera locations will be physically scaled to that their new exported units correspond to 'meters'.
If this checkbox is un-checkmarked (disabled) then the file will be output using a <unit> definition which is the same as the internal Okino system units currently in effect for the scene. For example, if the internal scene uses inches as its unit of measure then the <unit> template will be output with a 'name' set to inches, and the 'meter=' value set to the scale factor which scales inches to meters - no geometry/lights/cameras scaling will be performed in this secondary case.
Additional scene scaling factor
This value allows additional custom scaling to be applied to the overall exported scene. For example, if set to 10.0 then the entire exported scene (geometry, lights and cameras) will be scaled 10 times larger.Apply global transformation
If this checkbox is enabled then a general purpose global transformation will be applied to each exported COLLADA scene. This new transformation matrix will be applied to the root node in the exported COLLADA file.This option will allow you to, for example,
- Re-center all of the geometry so that it is centered at the origin (0,0,0) in the COLLADA file.
- Move all of the geometry so that it is sitting on the Y=0 (XZ) horizontal plane.
- Auto-scale the geometry so that it is no larger than a specific bounding box size.
- Scale the scene by a (X, Y, Z) value.
- Shear the scene by a (X, Y, Z) value.
- Rotate the scene by a (X, Y, Z) value.
- Translate the scene by a (X, Y, Z) value.
Since the lights and cameras are attached to this new global transformation node, they will be affected along with the geometry.
The transformation can be edited by pressing the "Edit Transform" button which will cause the following global transformation dialog box to appear:
The transformation matrix will be computed in two phase: (1) the transformations specified in the top "Automatic Scene Resizing" section, then (2) the single transformation specified in the "General Transformation Matrix" section.
The values on the dialog box are described as follows:
Automatic Scene Resizing
Center all geometry at the origin
If this checkbox is enabled (checkmarked) then all the geometry data will be positioned so that it is centered about the origin. If disabled then the geometry will not be repositioned.Make all geometry sit on the Y=0 horizontal plane
If this checkbox is enabled (checkmarked) then the geometry will be repositioned so that it is sitting flush with the top of the Y plane (the horizontal plane).Scale geometry to be no larger than:
This option allows the geometry data to be automatically rescaled if it is too large. If set to 'Do not scale the geometry' then no scaling will be done. If set to '1x1x1 units' then all the objects will be scaled smaller should they exceed 1x1x1 units in total size. Likewise for the '2x2x2 units' option. If set to 'User defined maximum size' then the maximum size of all the objects can be set using the type-in numeric box. The default is '2x2x2 units'.Although not quite the same, if the option is set to 'Use Absolute Scaling Factor' then all objects exported to the COLLADA file will be scaled absolutely by the user specified value. Thus, if you set the type-in value to 0.25 then all objects will be made 4 times smaller and if the value if set to 4 then all objects will be scaled 4 times larger. This is useful is you are converting a variety of different models to COLLADA format and you want them all uniformly scaled with the same scaling factor.
Transformation Matrix Values
Translate X, Y, Z
This applies a 3D translation by the specified amounts in the X, Y and Z dimensions.Scale X, Y, Z
This applies 3D scaling in the X, Y and Z dimensions. All 3 scale factors must be non-zero. Values above 1.0 will make the scene larger (2.0 will double the size of the scene) while values less than 0 will make the scene smaller (0.5 will half the size of the scene).Shear XY, XZ, YZ
This applies a linear shear in one of 3 directions:XY will shift all points in the X direction by the specified amount in proportion to the distance the points are located along the positive or negative Y axis. For example, using a value of 2.5 will shear all points by 68 degrees in the positive X direction; in other words, for every unit increase in the Y direction the X points will be shifted by 2.5 units.
XZ will shift all points in the X direction by the specified amount in proportion to the distance the points are located along the positive or negative Z axis.
YZ will shift all points in the Y direction by the specified amount in proportion to the distance the points are located along the positive or negative Z axis.
Rotate Around X Axis
Rotate Around Y Axis
Rotate Around Z AxisThis applies a rotation about the X, Y and/or Z axes. The rotation angle is restricted to the range -360 to 360 degrees. The angle of rotation is counter-clockwise when viewed from the positive to negative axis of rotation.Output Lights
If this checkbox is checkmarked then all light sources of the current 3D scene will be exported to the COLLADA file, including those parameters for ambient, point, spot and directional light sources.Output Light Attenuation Coefficients
If this checkbox is checkmarked then Constant, Linear or Quadratic will be output for point or spot light sources.
- If the Okino light decay value is 0 then Constant attenuation will be used.
- If the Okino light decay value is 1 then Linear attenuation will be used.
- If the Okino light decay value is 2 then Quadratic attenuation will be used.
- Otherwise no attenuation will be output.
If you find that your illuminated scene is too dark then one culprit can be this option. If the object(s) are too far from the light source(s) then the scene can appear dark.
Add new Lights
If this checkbox is checkmarked then new lights will be added to the COLLADA file. The pre-defined light locations, color and light types are chosen from the following drop-down combo box.

- The first two icons represent the light type (Sun = directional light, Light bulb = point light, Spot light = spot).
- The second two squares represent the color of each of these two light sources.
- The text describes the location of the new light sources (see image below for visual locations).
The new light sources will be placed according to the following image, along the XY plane. If you are looking down the Z axis (towards the negative Z axis) then upper-left will be (1), upper-right will be (3), lower-left will be (7) and lower-right will be (9).
Add New Lights Method
This combo box determines how the new lights are to be added to the exported COLLADA file.Merge with existing lights in the scene
This option will cause the newly chosen lights (from the drop-down combo box mentioned above) to be added to the already existing lights of the current 3D scene. In other words, all the lights of the current 3D scene will be output first, followed by the 1 or 2 new lights you have chosen from the drop-down visual list.Replace existing lights in the scene
This option will cause the newly chosen lights (from the drop-down combo box mentioned above) to be output to the COLLADA file, but no other light sources. None of the light sources in the original 3D scene will be output to the COLLADA file.Add new lights only if there are no existing lights in the scene
This option will cause the newly chosen lights (from the drop-down combo box mentioned above) to be output to the COLLADA file, but only if there are no existing lights in the original 3D scene. This is the default option. It will ensure that there are at least 1 or 2 new light sources added to the COLLADA scene if no lights exist in the original 3D scene.