

| You are here: Home » Import CAD Formats » NGRAIN's 3KO Solutions |
Support: 905-672-9328 Copyright © 2024 Okino Toronto, Ontario, Canada. |
|
The Softimage geometry export converter provides many options which control a multitude of features, including database access, automatic bitmap conversion to .pic format, geometry conversion, material parameter tweaking and selective entity output.
The options on the main panel control these features:
Save the exported files to a new directory (not applicable for database export). Set the Softimage export file version. Specify the directories and database name when exporting to a specific Softimage database.
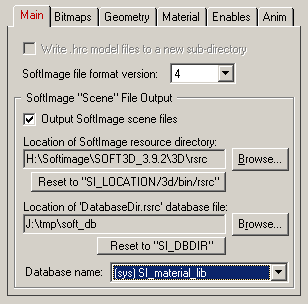
Write Files to a New Directory
If this checkbox is check-marked (which is the default) then a new directory will be created into which will be stored all of the Softimage .hrc file(s) and (optionally) the bitmaps written by this export converter. This option is disabled (grayed-out) if outputting a Softimage scene file since scene files are directly written to a Softimage database. The name for the new directory will be derived from the filename of the .hrc file. If this option is not enabled then no directory will be created.Softimage File Format Version
This drop-down list box allows the file format version to be specified for the exported files. The most recent version will be the default. You may want to change this option if the exported files are to be read by an older version of Softimage.Softimage "Scene" File OutputThe following options are only enabled if you would like to export the current scene to a Softimage database as a "scene" file, rather than as a single .hrc model file. Please read the short explanation which describes the step-by-step process of outputting a scene to a Softimage database.Output Softimage scene file
If this checkbox is check-marked then the current scene's contents will be output to a Softimage database. If this checkbox is un-checkmarked then the scene's contents will be output to a single .hrc model file (whose filename and location you can choose via a selector dialog box). The benefits of outputting to a Softimage database is that lights, cameras and other attributes can be sent to Softimage, in addition to placing the exported files directly into the Softimage database system.Location of Softimage resource directory
This option specifies the file path to the Softimage resource directory. It is only needed when exporting to Softimage database scene file (it is not needed when exporting to a single .hrc file). If your installation of Softimage resides in "c:\soft" then this filepath should be set to "c:\soft\3d\bin\rsrc". Alternatively, the "Reset to "SI_LOCATION/3d/bin/rsrc" button can be pressed which will set the directory to the assumed location of the Softimage resources. NOTE that the global environment variable 'SI_LOCATION' must point to the directory where your Softimage installation resides. Please refer to the Softimage installation guide for more information about this environment variable.Location of 'DatabaseDir.rsrc' database file
Softimage stores the list of the currently defined databases in one of two files. The system-wide databases are listed in a file called "DatabaseSys.rsrc" which is stored in the Softimage resource directory (see the option above); this list of databases can be accessed by all Softimage users. Alternatively, a private database list is available through a file called "DatabaseDir.rsrc"; each user of Softimage usually has their own private copy of this file. This dialog box option allows you to specify the directory where this private copy of "DatabaseDir.rsrc" resides on disk. Normally it is located in the directory specified by the global environment variable named "SI_DBDIR" which is automatically created when Softimage is initially installed. You can either press the "Browse" button and locate the "DatabaseDir.rsrc" file yourself, or you can press the "Reset to "SI_DBDIR"" button to reset the file's location to the assumed default location. Please refer to the Softimage installation guide for more information about this environment variable.Database name
Once the above two directory paths are proper set this drop-down combo box will display all of the valid Softimage databases that you have access to. Click on the drop-down list and choose one of the named databases. The exported scene file will be written to this database.
The options on the bitmaps panel control these features:
Automatic conversion of foreign bitmap formats (BMP, JPEG, GIF, Targa, TIFF, etc.) to Softimage .pic format. Options which allow the converted bitmaps to be resized to a power-of-two. The addition of an absolute filepath to each referenced bitmap file in the Softimage .hrc file. The addition of a specific filepath to each referenced bitmap file in the Softimage .hrc file (useful when all .pic bitmaps are located in a specific directory).
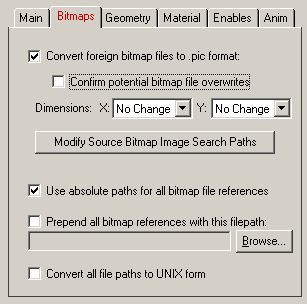
Convert Foreign Bitmap Files to .pic Format
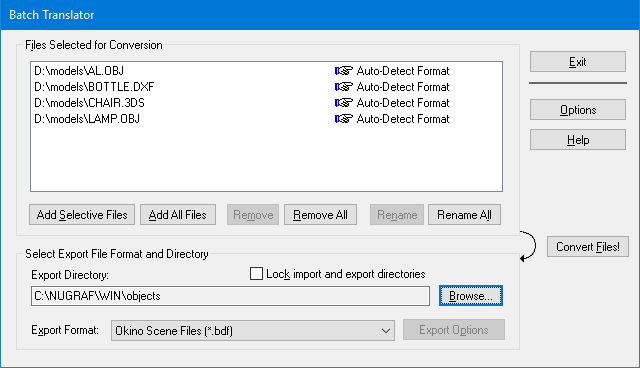
Softimage requires that all texture bitmaps be in the Softimage .pic file format. If this option is enabled (checkmarked) then any texture files which are not in the Softimage .pic format will be automatically converted by this converter to .pic format. The converted bitmap files will be placed in the same output directory as the converted Softimage scene file. If the texture(s) cannot be found in the location specified by the pathname prepended to the texture filename then the export converter will search for the texture(s) in all directories specified in the 'Default Search Path' and the 'Texture Bitmaps Search Path' file search paths (these can be modified by choosing the 'Preferences/Configure File Search Paths' menu item. Currently supported input bitmap file formats are BMP, IFF, JPEG, GIF, FLIC, Softimage PIC, TIFF, PPM and Targa (more may be currently available).As an alternative, the NuGraf/PolyTrans software includes a batch bitmap converter which allows a variety of file formats to be batch translated to/from the Softimage .pic format.
NOTE: If the 'Output Softimage scene files' option is enabled then all auto-converted bitmaps will be stored in the "pictures" sub-directory of the currently chosen Softimage database instead of the currently selected output directory.
Confirm Potential Bitmap File Overwrites
If this checkbox is enabled (check-marked) then the program will confirm that it is allowed to overwrite bitmap files on disk before it proceeds to do so. If this checkbox is disabled (un- checkmarked, which is the default) then the program will not confirm file overwrites.Dimensions: X = #, Y = #
If the 'Convert Foreign Bitmap Files to .pic Format' option is enabled then the following two drop-down list boxes determine the X and Y resolution for the converted bitmap file(s):
No Change = Do not change the X or Y size Closest = Use the next highest power-of-2 size 2, 4, 8, ... 256, 512 = Choose a specific size for the X or Y dimension Use Absolute Paths for all bitmap file references
If this checkbox is check-marked then all Softimage bitmap files which are stored as references in the Softimage .hrc file will have an absolute filepath prefixed to them. This will allow Softimage to find the absolute location of the bitmap files. This option should only be enabled if the location of the bitmap files is not to change after the conversion process is done. If this option is disabled then the bitmap references will be output with no changes at all; such references may or may not have absolute file paths on them.NOTE: If the 'Output Softimage scene files' option is enabled then all auto-converted bitmaps will be stored in the "pictures" sub-directory of the currently chosen Softimage database; references to these files will implicitly use absolute filepaths.
Prepend all bitmap references with this filepath
This option allows all bitmap references within a Softimage .hrc file to be prefixed with a new filepath. This might be useful, for example, if all of your Softimage .pic files are located in one specific directory or if you wish to change the prefix on the input scene's texture references. To choose the filepath either press the "Browse" button or click on the checkbox. To disable this option click on the checkbox again so that it comes un- checkmarked.If you previously converted all of your non-.pic files to .pic format, and stored the new .pic files in a specific directory, then you should enable this option so that the bitmap references within the .hrc file point to these pre-translated .pic files.
NOTE: Any bitmap images auto-converted to .pic format will not use this filepath. Rather the auto-converted files will be stored either in the currently chosen output directory (for .hrc file output) or in the "pictures" sub-directory when outputting to a Softimage database scene.
The options on the geometry panel control these features:
Whether to output NURB and bicubic patches in their original form or to output them as polygons (the converter will tesselate the patches). Triangulate polygons. Reverse the orientation of polygons and/or flip vertex normals.
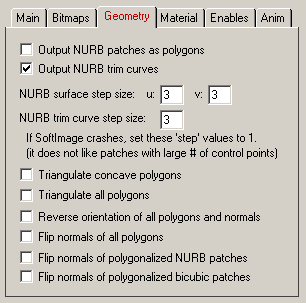
Output NURB patches as polygons
This converter has the capability of outputting NURB patches to Softimage or converting the NURB patches to polygons prior to export. If this checkbox is check-marked then all NURB patches will be converted to polygons. If this checkbox is disabled then NURB patches will be output directly.Output NURB trim curves
If this checkbox is check-marked then trimming curves will be output along with the NURB patches. If it is disabled then no trim curves will be output. This option is unavailable in the first release of the converter but may be available in the current demo if we forgot to remove this message.Output bicubic patches as polygons
This converter has the capability of outputting bicubic patches to Softimage or converting the bicubic patches to polygons prior to export. If this checkbox is check-marked then all bicubic patches will be converted to polygons. If this checkbox is disabled then bicubic patches will be output directly.Triangulate Concave Polygons
If this checkbox is check-marked then all concave polygons will be triangulated before being output to the Softimage file. This option is disabled by default which will allow concave polygons to be output to the file.Triangulate All Polygons
If this checkbox is check-marked then all polygons will be triangulated before being output to the Softimage file. This option is disabled by default. Please note that this option overrides the previous 'Triangulate Concave Polygons' option if it is enabled.Reverse orientation of all polygons and normals
If this option is enabled (checkmarked) then the orientation of all polygons will be reversed (this will effectively swap the orientation of the polygons' geometric normals).Flip normals of all polygons
If this option is enabled (checkmarked) then the vertex normals of each polygon will be flipped. You may need to do this if the geometry looks "dark" when rendered within Softimage.Flip normals of polygonalized NURB patches
If this option is enabled (checkmarked), and the 'Output NURB patches as polygons' option is enabled, then this option will flip the vertex normals of all polygons which were created from a NURB patch. You may need to do this if the polygonalized NURB geometry looks "dark" when rendered within Softimage.Flip normals of polygonalized bicubic patches
If this option is enabled (checkmarked), and the 'Output bicubic patches as polygons' option is enabled, then this option will flip the vertex normals of all polygons which were created from a bicubic patch. You may need to do this if the polygonalized bicubic patch geometry looks "dark" when rendered within Softimage.Output all data as a single mesh object
If this option is enabled (checkmarked) then then all of the objects currently defined in the scene will be accumulated into a single polygonal mesh model before being output to the Softimage .hrc or scene file. In this option is disabled then all of the objects will be output as separate polygonal models (the default). This option has limited use, although there may be special cases where you desire to want to work with a single mesh model rather than many (such as in 3d gaming applications).
The options on the material panel control these features:
"Multiplier" values which allow the intensity of the translated texture maps to be fine tuned. The values will be retained between invocations of the converter. A "lock" flag which allows the intensity of the ambient texture map to be locked to the intensity of the diffuse texture map. In general this makes converted files look less "washed out" when rendered within Softimage.
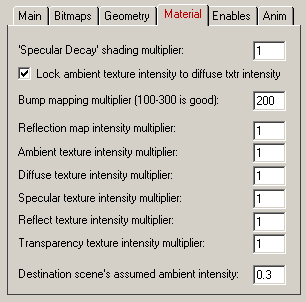
'Specular Decay' shading multiplier
This numeric parameter controls the relative size of the specular highlight stored within a Softimage material definition. Each material's "Specular Decay" value is first multiplied by this numeric value before being output to the Softimage file. For example, a value of 2 will make the specular decay value twice as big, while a value of 0.5 will make it twice as small. Higher values will make the Softimage material appear to be more shiny.Lock ambient texture intensity to diffuse txtr intensity By the very nature of its design, Softimage allows a texture map to be fed into both the Ambient and Diffuse color shading channels. However, other 3D packages typically only feed a texture map into the Diffuse (surface) color channel. When converting from these other 3D packages it is sometimes advantageous to feed the texture map into both the Ambient and Diffuse shading channel's of a Softimage 2D texture so that the texture map does not get washed out by the material's ambient surface color. This is the default action is this check-box is enabled. If the check-box is disabled then the Diffuse texture map will not be fed into Ambient shading channel which may cause the resulting rendered surface to have too much ambient surface color.
Bump mapping multiplier (100-300 is good)
This numeric parameter affects the translation of a bump map's intensity. Softimage expects a bump map's intensity to be in the range -20 to 20 whereas this converter's internal database uses values that are much smaller (such as +-0.003). This numeric value defines how much larger the Softimage bump map intensity will be scaled from those of the converter's internal database. Values from 100 to 300 produce equivalent results.Reflection map intensity multiplier
This numeric parameter acts as a multiplier for the "Reflection Map Intensity" slider value shown on the Softimage "2D Texture File" editor dialog box. Before this converter exports its reflection map intensity value to the Softimage texture definition it first multiplies the value by this dialog box parameter. Values should be greater than 0. A value of 2.0 will make the reflection map appear twice as bright, while a value of 0.5 will make the reflection map appear twice as dark. The exported reflection map intensity value will be clamped to the range 0.0 to 1.0.Ambient texture intensity multiplier
This numeric parameter acts as a multiplier for the "Ambient" texture map intensity slider value shown on the Softimage "2D Texture File" editor dialog box. Before this converter exports its ambient texture map intensity value to the Softimage texture definition it first multiplies the value by this dialog box parameter. Values should be greater than 0. A value of 2.0 will make the ambient texture map appear twice as bright, while a value of 0.5 will make the ambient texture map appear twice as dark. The exported ambient texture map intensity value will be clamped to the range 0.0 to 1.0.Diffuse texture intensity multiplier
This is the same as the "Ambient texture intensity multiplier" except that it affects the diffuse texture map intensity.Specular texture intensity multiplier
This is the same as the "Ambient texture intensity multiplier" except that it affects the specular texture map intensity.Reflect texture intensity multiplier
This is the same as the "Ambient texture intensity multiplier" except that it affects the reflect texture map intensity.Transparency texture intensity multiplier
This is the same as the "Ambient texture intensity multiplier" except that it affects the transparency texture map intensity.Destination scene's assumed ambient intensity
Normally, by default, Softimage uses an atmospheric color of 30% white (color = (0.3, 0.3, 0.3)). This export converter compensates for this "dark" atmospheric color by making the exported ambient material and texture colors brighter. However, to do this compensation the converter must know the average atmospheric intensity, which is assumed to be 0.3. The exact value can be found by pressing the "Atmosphere/Ambience" button shown in the Softimage "Matter" module.
The options on the "enables" panel control these features:
Which entities within the converter's internal database are to be output to the Softimage file(s).
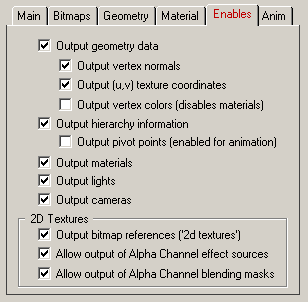
Output Geometry Data
If this checkbox is enabled (checkmarked, which is the default) then the polygonal mesh, NURB surface and bicubic patch data will be output to the Softimage file. If disabled then no geometric data will be output to the file.Output Vertex Normals
If this checkbox is enabled (checkmarked, which is the default) vertex normals will be output along with each polygon. If disabled, then each normal will be set to (0,0,0) when each polygon is being output.Output Hierarchy Information
If this checkbox is enabled (checkmarked, which is the default) then the child-parent relationship between all of the objects in the scene will be output to the file. If disabled then all objects will be attached to the root node.Output Materials
If this checkbox is enabled (checkmarked, which is the default) then materials will be output to the file.Output Lights
If this checkbox is enabled (checkmarked, which is the default) then lights will be output to the Softimage scene file. Note that no lights can be output to a Softimage .hrc file.Output Cameras
If this checkbox is enabled (checkmarked, which is the default) then cameras will be output to the Softimage scene file. Note that no cameras can be output to a Softimage .hrc file.Output Bitmap References ('2d textures')
If this checkbox is enabled (checkmarked, which is the default) then references to bitmap textures will be output along with the material definitions in the Softimage file.Output (u,v) Texture Coordinates
If this checkbox is enabled (checkmarked, which is the default) then (u,v) texture coordinates will be output to the Softimage object file.Allow output of Alpha Channel Effect Sources
If this checkbox is enabled (checkmarked, which is the default) then the converter will correctly output either "RGB Intensity" or "Alpha Channel" as the "Map Component" shown in the Softimage "2D Texture File" dialog box. In other words, it will allow the texture image to act as an alpha channel effect source. If this option is disabled then the "Map Component" option will always be set to "RGB Intensity".Allow output of Alpha Channel Blending Masks
If this checkbox is enabled (checkmarked, which is the default) then the converter will correctly output either "RGB Intensity Mask", "Alpha Channel Mask " or "Without Mask" as the "Blending" option shown in the Softimage "2D Texture File" dialog box. In other words, it will allow the texture image to act as an alpha channel blending mask. If this option is disabled then the "Blending" option will always be set to "Without Mask".