

| You are here: Home » Import CAD Formats » AutoCAD-Revit-Navisworks (DWF-3D) |
Support: 905-672-9328 Copyright © 2024 Okino Toronto, Ontario, Canada. |
|
This import converter reads in binary and ASCII PLY formatted files.
Please also refer to the corresponding PLY file exporter.
The PLY format describes an object as a collection of vertices, faces and other elements, along with properties such as color and normal direction that can be attached to these elements. A PLY file contains the description of exactly one object. Sources of such objects include: hand-digitized objects, polygon objects from modeling programs, range data, triangles from marching cubes (isosurfaces from volume data), terrain data, radiosity models. Properties that might be stored with the object include: color, surface normals, texture coordinates, transparency, range data confidence, and different properties for the front and back of a polygon.
The PLY format is NOT intended to be a general scene description language, a shading language or a catch-all modeling format. This means that it includes no transformation matrices, object instantiation, modeling hierarchies, or object sub-parts. It does not include parametric patches, quadric surfaces, constructive solid geometry operations, triangle strips, polygons with holes, or texture descriptions.
A typical PLY object definition is simply a list of (x,y,z) triples for vertices and a list of faces that are described by indices into the list of vertices. Most PLY files include this core information. Vertices and faces are two examples of "elements", and the bulk of a PLY file is its list of elements. Each element in a given file has a fixed number of "properties" that are specified for each element. The typical information in a PLY file contains just two elements, the (x,y,z) triples for vertices and the vertex indices for each face. Applications can create new properties that are attached to elements of an object. For example, the properties red, green and blue are commonly associated with vertex elements. New properties are added in such a way that old programs do not break when these new properties are encountered. Properties that are not understood by a program can either be carried along uninterpreted or can be discarded. In addition, one can create a new element type and define the properties associated with this element. Examples of new elements are edges, cells (lists of pointers to faces) and materials (ambient, diffuse and specular colors and coefficients). New elements can also be carried along or discarded by programs that do not understand them.
- http://graphics.stanford.edu/data/3Dscanrep - The Stanford 3D scanning repository.
- http://www.cc.gatech.edu/projects/large_models - Very large models in the PLY file format.
- http://www.cs.unc.edu/~geom/Powerplant - The Power Plant Model is a complete model of an actual coal fired power plant.el of an actual coal fired power plan The model consists of 12,748,510 triangles in 1185 .ply files, and is available in one large download or in smaller sections for those not needing the entire model. The Walkthru Group at UNC Chapel Hill has used the model extensively for its research in Interactive Rendering, Visibility Culling, Simplification, Texture and Image-Based Techniques, Collision Detection, Virtual Environments, and other research areas.
- PLY is mean to be a simple, easily parsable file format and hence only conveys basic geometry information.
- Only one object definition can be specified per PLY file. Hence, an entire 3D scene may require more than one PLY file to be imported.
- No material definitions are standardized in the PLY format, although this importer does recognize a "material" element.
- No lights, cameras, hierarchy, animation are provided by the PLY file format.
The following table describes the element types that are parsed and imported. In general, this support will allow all common PLY files and their contents to be imported with high fidelity:Element Type Properties Face Index list Vertex "x", "y" and "z" vertex coordinates Vertex "nx", "ny" and "nz" vertex normals Vertex "u" and "v" vertex texture coordinates Vertex "red", "green" and "blue" vertex colors (0..255 integers or 0..1 normalized)
While not common nor standardized in PLY files, this importer has been augmented to recognize and import the first "material" element found in the file.
The syntax for the "material" element should look similar to the following in the header section (this element defines "1" material in the PLY file). The "specular_power" is assumed to lie between 0.0 and 1.0. The opacity is assumed to lie between 0.0 and 1.0. Each color coefficient must lie between 0.0 and 1.0.
element material 1 property uchar ambient_red property uchar ambient_green property uchar ambient_blue property float ambient_coeff property uchar diffuse_red property uchar diffuse_green property uchar diffuse_blue property float diffuse_coeff property uchar specular_red property uchar specular_green property uchar specular_blue property float specular_coeff property float specular_power property float opacityFor example, the following PLY file defines a cube with vertex colors and one material assignment.
ply format ascii 1.0 comment made by Greg Turk comment this file is a cube element vertex 8 property float x property float y property float z element face 6 property list uchar int vertex_indices element material 1 property uchar ambient_red property uchar ambient_green property uchar ambient_blue property float ambient_coeff property uchar diffuse_red property uchar diffuse_green property uchar diffuse_blue property float diffuse_coeff property uchar specular_red property uchar specular_green property uchar specular_blue property float specular_coeff property float specular_power property float opacity end_header 0 0 0 0 0 1 0 1 1 0 1 0 1 0 0 1 0 1 1 1 1 1 1 0 4 0 1 2 3 4 7 6 5 4 4 0 4 5 1 4 1 5 6 2 4 2 6 7 3 4 3 7 4 0 255 255 255 0.3 255 255 255 0.4 255 255 255 0.6 0.4 1.0
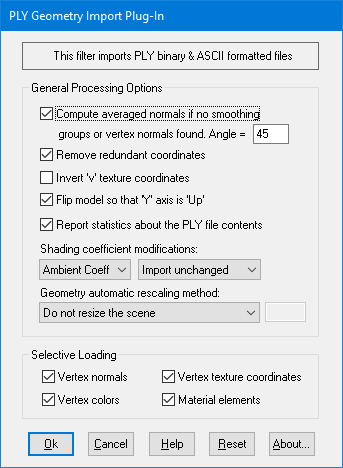
These options control how the imported geometry is processed before it is sent to the NuGraf/PolyTrans internal database.
Compute averaged normals
If this checkbox is enabled then new vertex normals will be computed for a polygon if it does not have any vertex normals already. The Import Vertex Normals checkbox must also be enabled. The smoothing criterion is based on the angle between abutting polygons; common smoothed vertex normals will be computed if the angle between their geometric surfaces normals is less than the angle specified on the dialog box (which defaults to 45 degrees). Note that the vertices will be welded together prior to this smoothing operation taking place.Remove Redundant Coordinates
If this checkbox is enabled then an algorithm will be invoked to remove redundant vertices, normals, uv texture coordinates and vertex colors.Invert "v" Texture Coordinates
If this checkbox is enabled then the "v" texture coordinate imported from the PLY file will be inverted, such that "v_new = 1.0 - v_old". In general this should never need to be enabled but past experience has shown that some programs export "v" texture coordinates "upside down".Flip Model so that Y Axis is Up
If this checkbox is enabled then the model will be reoriented so that the "Up" axis of the model will be aligned with the positive Y axis (which is used by the converter) instead of the positive "Z" axis.Report Statistics About the PLY File Contents
If this checkbox is check-marked then parsing statistics will be displayed in the message window after the PLY file has been imported.Shading Coefficient Modifications
See below for a longer explanation of these combo boxes. In general, these combo boxes allow the key material attributes to be tweaked during import. This might be necessary, for example, if the imported objects appear too ambient, or too luminous.Basic PLY files have no materials defined in them. However, if this importer can detect some aspect of a material attribute then it will attempt to import such material values (such as surface color, opacity, etc).
Geometry Automatic Rescaling Method
This combo box provides access to a useful mechanism which automatically rescales the imported mesh geometry to a size best needed by other 3D software packages. For example, a Solid Edge test file imported into this converter had a size of only 0.05 units across (probably due to the implicit modeling units used within the Solid Edge program); this model was much too small (in extents) for other 3D programs to manipulate properly. To overcome these scaling issues, this combo box can be used to automatically resize any imported model data to a useful size, such as scaled to easily fit inside a box of 2x2x2 raw working units (which is the default). The various options are described as follows:Do Not Resize the Scene
No resizing is done to the imported data.Resize to 1x1x1 units
Resize to 2x2x2 unitsThe model data is automatically scaled up in size, or scaled down in size so that its worldspace extents fits inside a 1x1x1 or 2x2x2 sized unit cube. The latter is the default.Resize to User Defined Absolute Size
The model data is automatically scaled up in size, or scaled down in size so that its worldspace extents fit inside a cube whose size is user defined by the type-in value shown on the dialog box. For example, if you enter the value 20 then the imported data will be resized so that its maximum extent in one or more dimensions is 20 units.Scale Larger by User Defined Factor
Scale Smaller by User Defined FactorThese options allow the imported model data to be scaled larger or scaled smaller by an absolute number. For example, if you select the larger option and enter 10 into the type-in box, then the imported model will be scaled 10 times larger during the import process.Selecting Loading
These options allow specific portions of the PLY file to be imported.Vertex Normals
If checkmarked, vertex normals will be imported. PLY files contain vertex normals which are used to make the imported object appear smooth when shaded.Vertex Texture Coordinates
If checkmarked, vertex uv texture coordinates will be imported. These texture coordinates (if provided) are necessary in order for 2d bitmap textures to be applied to objects.Vertex Colors
If this checkbox is enabled then vertex colors will be imported. PLY files most often use vertex colors to define the overall color of a model and not material definitions.Material Elements
If this checkbox is enabled then the "material" element will be imported and assigned to the single object. See the section "Custom "Material" Element" above.Shading Parameter Modification Combo Boxes
These combo boxes provide hands-on control over how imported material shading parameters should be modified so that the imported model can be rendered nicely in a photo-realistic rendering program. All too often the imported model appears "too ambient" or "too diffuse" resulting in rendered images that are washed out or with no gradual shading effects visible. The two combo boxes and the single numeric type-in box provide you good control over the ambient, diffuse, specular, luminous and reflection shading coefficients imported into PolyTrans/NuGraf, as well as the opacity of the material, its index of refraction (IOR) and Phong shininess value.
The first drop-down combo box selects which of these shading parameters you want to modify. Each shading coefficient has its own operation which can be selected (the second combo box) and an optional numeric type-in value (the third data entry text input). The following describes the various shading parameters that can be controlled:
- Ambient Coefficient: This controls the amount of color reflected from an object based on the ambient light in a scene. A good default value is 0.1 through to 0.3 and ideally ranges from 0.0 to 1.0. Some programs have an ambient shading coefficient parameter (NuGraf/PolyTrans, Electric Image, etc) while others do not (3D Studio). If an export file format does not support an ambient shading coefficient then this value will be multiplied into the ambient shading color itself.
- Diffuse Coefficient: This controls the amount of color reflected from an object based on the direct light shining on it. A good default value is 0.4 and ideally ranges from 0.0 to 1.0. Some programs have a diffuse shading coefficient parameter (NuGraf/PolyTrans, Electric Image, etc) while others do not (3D Studio). If an export file format does not support a diffuse shading coefficient then this value will be multiplied into the diffuse shading color itself.
- Specular Coefficient: This controls the intensity of the highlight color on an object. A good default value is 0.7 and ideally ranges from 0.0 to 5.0. If an export file format does not support a specular shading coefficient then this value will be multiplied into the specular shading color itself.
- Luminous Coefficient: This controls how much color is added directly to an object, irrespective of any light which shines on it (the higher the value, the more the object will appear to glow). In general you should keep this value at 0. If an export file format does not support a luminous shading coefficient then this value will be multiplied into the luminous shading color itself.
- Opacity: This is the inverse of transparency. 0.0 will make the object fully transparent, while at 1.0 the object will be fully opaque.
- Phong Shininess: This controls the width of the specular highlight seen on an object. An ideal range is 6 (very wide) to 300 (very narrow). The default is 32.
For each material shading parameter, several actions can be performed on it during the import process:
- Do Not Import: The shading parameter is not imported at all. No value is imported nor sent to PolyTrans/NuGraf. Thus, the default material shading parameter value (as set inside PolyTrans/NuGraf) will be used instead.
- Import Unchanged: The shading parameter is imported as is, with no change.
- Set and Use Default: The shading parameter is set to some good default value (as determined by the import converter). This default value will be shown in the type-in box.
- Set to Specific Value: The imported shading parameter will be overridden with the user specified value of the numeric type-in box.
- Import and Crop by: The shading parameter is imported and will remain unchanged if it is less than the numeric type-in value shown on the dialog box. If it is greater, then the imported value will be clamped to be no greater than the numeric type-in value. This is a good operation, for example, if you do not wish for the ambient shading coefficient to be greater than 0.3.
- Import and Scale by: The shading parameter is imported and multiplied by the numeric type-in value shown on the dialog box
- Normalize Color and Coefficient: This option only applies for the ambient, diffuse, specular and luminous shading coefficients and their respective RGB colors. This option is a hybrid approach which tries to automatically guess at a proper shading coefficient value given the raw (and corresponding) color imported from the file. As mentioned, the shading coefficient is needed to create nice looking (nicely shaded) images in a photo-realistic rendering program. If this option is chosen, then the specific shading coefficient will be derived directly from the relative intensity of the imported color which corresponds to this shading coefficient (diffuse color for diffuse shading coefficient etc.). For example, if the imported diffuse color is (0.4, 0, 0), which is 40% of full-bright red, then the diffuse shading coefficient will be set to 0.4 and the diffuse color will be modified to be (1, 0, 0). When the new color (1,0,0) and the new shading coefficient (0.4) are multiplied together, it results in the original color imported from the file (0.4, 0, 0). In general you may wish to use the Set and Use Default option to get good rendered results.