

| You are here: Home » Import CAD Formats » AutoCAD-Revit-Navisworks (DWF-3D) |
Support: 905-672-9328 Copyright © 2024 Okino Toronto, Ontario, Canada. |
|
This geometry import converter reads in Wavefront 'OBJ' format files (and 'MTL' material files) in their entirety, including:
- Polygonal meshes, lines, 3D points
- NURBS surfaces and associates trimming curves
- Geometry attributes such as vertex, normal and texture coordinates
- Grouping and object segmentation information
- Smoothing information
- Complete material file (.mtl) parsing
Please also refer to the corresponding Wavefront export converter.
This import converter is a complete and accurate implementation of the Wavefront OBJ file format, including the parsing of all attributes in a Wavefront material ('.mtl') file. It has been the first and still-primary implementation of the Wavefront OBJ file format specification for over 30 years.
Uniquely, it also parses the full Wavefront NURBS file format, allowing trimmed NURBS data to be imported from such programs as Rhino-3D; when imported into Okino software, the NURBS data remains as true trimmed NURBS, allowing the data to be exported as trimmed NURBS to such supported file formats as Renderman RIB or IGES. When outputting to a polygonal file format (FBX, COLLADA, 3ds Max, Maya, LightWave, CINEMA 4D, etc.) the PolyTrans export converter will tesselate the trimmed NURBS patches to optimized indexed polygon lists prior to export.
The converter will also read material definitions from a Wavefront material file (typically which has a file extension '.mtl') if the material file is referenced within the Wavefront geometry file (typically which has a file extension '.obj') using the 'mtllib' keyword. If one or more Wavefront material files are listed on a single line then all will be read into memory for possible reference by the geometry file.
The converter first reads the entire file into memory; this includes the vertex, normal and texture coordinate lists, their indice lists, all group names, material names and texture names, and the smoothing groups assigned to each polygon. Next, the converter computes new vertex normals for polygons that don't have any normals and that have a non-zero smoothing group assigned to them. If no smoothing groups are found then the converter optionally creates smoothed vertex normals based on the angle between abutting polygon faces. As a last step, the polygonal data is separated into separate objects based on a user-chosen criteria.
A very useful feature of the OBJ importer is its ability to explode an imported mesh model, line model or pointset model based on their associated group name, object name, smoothing group number, material name or texture map name. This is one of the most complex aspects of the Wavefront OBJ importer.
- If any texture map names are found in the .obj file ('usemap
', which is the old-style Wavefront texture reference method) and the 'Use Material Name' drop-down list box option is enabled then texture definitions will be automatically created for these texture names and will be assigned to their corresponding surfaces. NOTE:: you can distinguish these textured surfaces because the texture map name is appended to the end of the surface name (the surface and texture names are separated by three underscores '_').
- All texture map information is read in from a material file. The supported mapping parameters include:map_Ka, map_Kd, map_Ks, map_d, map_refl and map_bump. All sub-option parameters are also read into memory and mapped to equivalent internal database values: -o, -s, -mm and -bm.
- If one or more group names are found on a 'g' line, then they are appended all together to form the group name used internally (ie: 'g all airplane tail_fin').
- All texture map information is read in from a material file. The supported mapping parameters include:map_Ka, map_Kd, map_Ks, map_d, map_refl and map_bump. All sub-option parameters are also read into memory and mapped to equivalent internal database values: -o, -s, -mm and -bm.
The following information explains the various options on the dialog box:
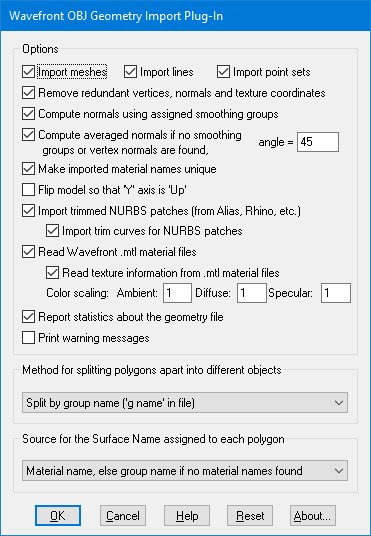
Import Meshes
If this checkbox is enabled then polygonal meshes will be imported. Meshes are defined by lines in the OBJ file which begin with the letter "f" or "fo".Import Lines
If this checkbox is enabled then 3D lines will be imported. Lines are defined by lines in the OBJ file which begin with the letter "l".Import Point Sets
If this checkbox is enabled then 3D point sets will be imported. Point sets are defined by lines in the OBJ file which begin with the letter "p". To see where such point sets can be exported to, refer to the Okino points file exporter documentation.Remove redundant vertices, normals and texture coordinates
If this checkbox is enabled then redundant vertices, normals and texture coordinates are removed from meshes, lines and point sets. This is the default.Compute normals using assigned smoothing groups
If this checkbox is enabled then new vertex normals will be computed for a polygon if it does not have any vertex normals already and it has been assigned a non-zero smoothing group number. Two abutting polygons will appear to be smooth only if they share common vertices.Compute averaged normals
If this checkbox is enabled then new vertex normals will be computed for a polygon if it does not have any vertex normals already, and it does not have a smoothing group assigned to it or the 'Compute normals using assigned smoothing groups' checkbox is disabled. The smoothing criterion is based on the angle between abutting polygons; common smoothed vertex normals will be computed if the angle between their geometric surfaces normals is less than the angle specified on the dialog box (which defaults to 30 degrees).Make imported material names unique
If this checkbox is enabled (which is the default) then the import converter will make all new material names unique if there are conflicts upon import. For example, if a model currently resides in memory which uses a surface definition (a 'material') named 'redbricks' and another Wavefront file is read into memory which also contains the material called 'redbricks' then this second reference will be renamed to 'redbricks#2' once it has been imported into the scene. The benefit of enabling this option is that two imported files will use completely different material/surface definitions, even if the imported files are read in from the same Wavefront .obj file.If this checkbox is disabled then any imported file which makes references to materials that are already loaded into the scene will use those materials/surfaces rather than create new unique ones. Disabling this option is useful if multiple Wavefront .obj files share a common Wavefront .mtl file (ie: all imported .obj files should only share one set of material/surface definitions in memory).
Import Trimmed NURBS Patches (From Rhino-3D, etc.)
This Wavefront import converter has the unique feature of being able to import complete trimmed NURBS model descriptions from a Wavefront OBJ file. If this checkbox is enabled (check-marked) then trimmed NURBS models will be imported. If disabled (un-checkmarked) then all NURBS models will be ignored.If you wish to prevent the trim curves of each NURBS patch from being imported then disable the "Import trim curves for NURBS patches" checkbox.
Read Wavefront.mtl material files
If this checkbox is enabled then the import converter will read in and parse any Wavefront .mtl material files referenced within the .obj file (via the keyword 'usemtl'). If this option is disabled then no material files will be read.Read texture information from .mtl material files
If this checkbox is enabled then the texture mapping information found in a Wavefront .mtl material file will be read into memory and stored along with the new surface definitions created. If this checkbox is disabled then no texture mapping information will be read in from the material file.Color scaling: Ambient, diffuse, specular
These three values allow the intensity of the ambient ('Ka'), diffuse ('Kd') and specular ('Ks') colors found within a Wavefront .mtl material file to be scaled brighter or darker. Many 3d programs export Wavefront material colors overly saturated (ie: ambient = 100% white, diffuse = 100% white) whereas many 3d rendering programs would like to see these values at about 30% to 50% of full saturation. For example, if the 'Ka' value is set to 0.3 and the ambient material color is specified as (1 1 1) = 100% white, then the ambient color will be read into the database as (0.3, 0.3, 0.3) = 30% white.Report statistics about the geometry file
If this checkbox is enabled then statistics about the geometry file will be reported once it has been read in and processed.Print warning messages
If this checkbox is enabled then warning messages will be reported as the file is read in. Warnings include unrecognized input and options, out-of-range texture coordinates and out-of- range index values.Source for the Surface Name
This drop-down list box specifies which method the converter is to use to assign a surface definition to each polygon. Automatic assignment of surfaces to the polygons will save you a lot of time and headache.Use material name, else group names if no materials found
The surface name will be taken from the material name assigned to each polygon. If no materials are found in the file then the surface name will be taken from the group name assigned to each polygon. ace name will be taken from the material name assigned to each polygon. If no group names are assigned to the polygons then the surface name will be taken from the object name assigned to each polygon. If no material, group or object name is assigned then the "default" surface will be used.This is the default method.
Use material names found in file, else "default" surface if no materials
This will use the material name associated with each polygon as the surface name. If no material name is assigned then the "default" surface will be used.Use group names found in file, else "default" surface if no groups
This will use the group name associated with each polygon as the surface name. If no group name is assigned then the "default" surface will be used.Use object names found in file, else "default" surface if no objects
This will use the object name associated with each polygon as the surface name. If no object name is assigned then the "default" surface will be used.Method for Splitting Polygons into Different Objects.
If your 3D scene is going to have many different objects in it then it is recommended that the OBJ not be split up. However, if you want to modify each individual part in the OBJ file then you will want to split it up into different objects.Don't split into different objects
This option prevents the OBJ file from being split up into separate objects.Split by object name
This will split the polygonal geometry according to the object name assigned to each polygon.Objects are assigned to polygons in the OBJ file by preceding them with a line like: 'o
... '. Split by group name
This will split the polygonal geometry according to the group name assigned to each polygon. It is the most logical method for splitting the geometry since the group names are usually assigned on an object-name basis by the person who designed the 3D model.Groups are assigned to polygons in the OBJ file by preceding them with a line like: 'g
... '. Split by material name
This will split the polygonal geometry according to the material name assigned to each polygon. You may want to use this method if no group names are provided in the file or if it makes more sense to split by material name than by group name (for example, the object might have 300 odd group names but 20 carefully chosen material names).Materials are assigned to polygons in the OBJ file by preceding them with a line like: 'usemtl
'. Split by texture map name
This will split the polygonal geometry according to the texture map name assigned to each polygon. In most cases you will not use this method.Texture map names are assigned to polygons in the OBJ file by preceding them with a line like: 'usemap
'. Split by smoothing group numbers
This will split the polygonal geometry according to the smoothing group number assigned to each polygon. Since smoothed polygons are usually clustered together as one sub-object this method can be used to accurately extract sub-objects from the polygonal data. However, it will probably create many more new objects than would the 'Split by group name' method above.Smoothing groups are assigned to polygons in the OBJ file by preceding them with a line like: 's
'.