

| You are here: Home » Import CAD Formats » IFC |
Support: 905-672-9328 Copyright © 2026 Okino Toronto, Ontario, Canada. |
|
This import converter handles a significant aspect of the SGI Inventor 2.x and VRML 1.0 file formats. This version of "Inventor" is not to be confused with the native file format of the Autodesk Inventor solid modeling package; rather, this it is the native file format of the SGI (Silicon Graphics) OpenInventor toolkit.
The VRML 1.0 file format is a direct sub-set of the SGI Inventor 2.0 file format, hence this import converter can equally handle VRML 1.0 files as an added benefit. See below for the limitations of this import converter.
This software is based in part on the COIN 3D library which is a clone of the SGI Open Inventor library. See www.coin3d.org. Copyright (C) Systems in Motion. All Rights Reserved. Used under GNU LGPL
Open Inventor is a trademark of SGI Inc.
Okino has spent well over 2 years writing and refining its VRML 2.0 import converter. Please use that importer to read in VRML 2.0 files and not this import converter.
X3D is, in basic terms, an XML version of the VRML 2.0 file format (levels 1 and 2). To import X3D files, first convert the XML file (levels 1 and/or 2) to VRML 2.0 format and then import via Okino's VRML2 importer.
The following highlights some of the features of this converter:
- This converter imports all Open Inventor versions from 2.0 to 2.5, ASCII and binary, and VRML 1.0.
- Geometry nodes imported: IndexedFaceSet, FaceSet (meshes), IndexedTriangleStripSet, TriangleStripSet, QuadMesh, Cube, Cone, Cylinder, Sphere and Text3. These nodes are all triangulated internally during the import process and recombined into meshes - Nugraf/PolyTrans geometry instances.
- Vertex normals, vertex texture coordinates, vertex colors, per-face colors and material assignments are supported for all mesh geometry.
- For mesh geometry (e.g. IndexedFaceSet), colors can be assigned on a per-vertex or per-face basis. If assigned on a per-face basis, the face colors are converted to polygon-assigned NuGraf/PolyTrans materials. Any inherited texture maps will be assigned to these per-polygon materials as well.
- Each Material parameter is imported and stored, including diffuse, ambient and specular colors, emissive color, shininess and transparency.
- Packed diffuse colors are imported.
- The DirectionalLight, PointLight and SpotLight nodes are properly imported as well as their related parameters.
- The Texture2 node is imported. File-referenced bitmaps and embedded texture bitmaps are supported.
- Texture2Transform nodes are imported and transformations are applied to texture coordinates directly.
- Bitmaps which are embedded within the file are automatically extracted and converted to TIFF files on disk. The images are also displayed on the screen as they are being imported.
- Group nodes imported include: Array, Group, MultipleCopy, Separator, and TransformSeparator. The current transformation matrix is accumulated in the state as the file is traversed and nodes are encountered. Group nodes are imported as NuGraf/PolyTrans empty instances (yellow folders) and do not have explicit transformations applied to them. Instead, all geometry instances, lights and cameras have their accumulated transformation matrix applied directly at the instance level.
- Perspective and orthographic cameras are imported along with their parameters.
- Names of imported nodes, as defined in the file by the DEF keyword are imported for groups, lights, cameras, materials and shapes (geometry). Otherwise the default node type is used as a base name (e.g. SoCylinder1, SoCylinder2, etc.)
- An optional optimization algorithm can be enabled after import is completed to remove redundant nodes from the scene graph and hierarchy.
- A complex mechanism under complete user control can be used to tweak all material color and shading parameters during import.
- An Okino polygon merging algorithm can be enabled during the import process to turn triangle meshes into quad or n-sided meshes (optimization process). Vertices, vertex colors, vertex normals and vertex texture coordinates can also be welded during the import process.
- Inventor/VRML1.0 supported material bindings in this importer include: OVERALL, PER_PART, PER_PART_INDEXED, PER_FACE, PER_FACE_INDEXED, PER_VERTEX, PER_VERTEX_INDEXED.
- Material nodes accumulated in the scene graph state are imported as vertex colors for any geometry whose bindings are assigned as PER_VERTEX or PER_VERTEX_INDEXED. Otherwise, the materials are fully imported and assigned directly to geometry faces or the whole instance by NuGraf/PolyTrans.
- This importer has been optimized for a special case of material import, specifically for VRML 1.0 files from Lightscape, in which pre-computed lighting is transferred through the VRML 1.0 file format using only emissive colors. In such a case the emissive colors are imported as vertex mesh colors in PolyTrans/NuGraf. As quoted from the VRML1.0 file format specification:
Specifying only emissiveColors and no diffuse, specular, emissive, or ambient colors is the way to specify pre-computed lighting. It is expected that browsers will be able to recognize this as a special case and optimize their computations. For example:
Material { ambientColor [] diffuseColor [] specularColor [] emissiveColor [ 0.1 0.1 0.2, 0.5 0.8 0.8 ] }For more info see http://www.web3d.org/fs_specifications.htm
The Inventor texture blend models MODULATE and DECAL are emulated through the NuGraf/PolyTrans texture and surface modulation parameters.
- LineSet and PointSet nodes are not imported since they contain no 3D geometry.
- NURBS curves and surface shape nodes are not imported. NURBS surfaces and curves are handled through the IGES, SoftImage, openNURBS and other related file formats in Okino software.
- Animation data applied to Shape nodes are not imported. However, object and camera animation data is imported via the Okino VRML2 importer.
- Environment nodes are not imported.
- The interactive capabilities of the Open Inventor specification are not handled by this converter. The Open Inventor and VRML1.0 APIs provide substantial functionality for developing fully interactive 3D applications or interactive real-time browser controlled viewing. This importer cannot support mouse and user driven events like a fully compliant Inventor/VRML1.0 browser. In general, this converter was designed to import geometry, lights, cameras, materials, textures and object group hierarchy. This converter imports these items as accurately as possible according to the Open Inventor and VRML1.0 specifications.
Array Cone Cube Cylinder DirectionalLight FaceSet Group IndexedFaceSet IndexedTriangleStripSet Material MultipleCopy OrthographicCamera PerspectiveCamera PointLight QuadMesh Separator Sphere SpotLight Text3 Texture2 Texture2Transform TransformSeparator TriangleStripSet
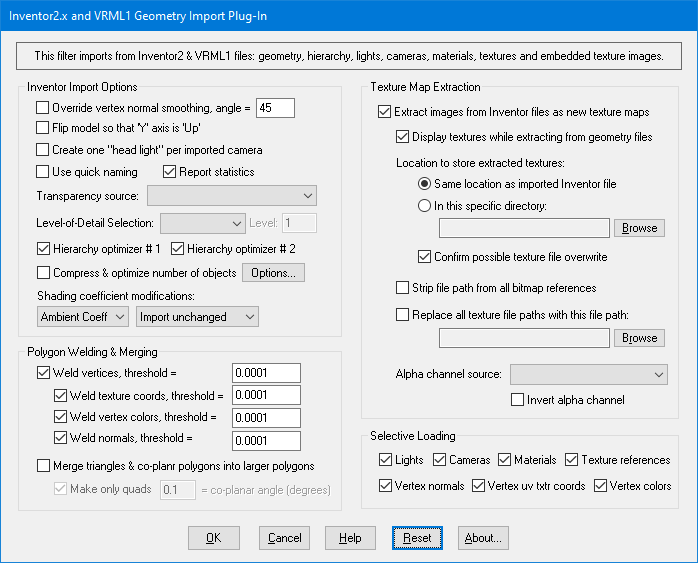
Inventor Import Options
Override Vertex Normal Smoothing Angle
Normally all Inventor and VRML 1.0 files have their surface smoothing specified by "vertex normals" assigned to vertices or faces of the mesh data. Hence, no user intervention is required.
However, if you wish to override the surface smoothing details of an imported file then enable this checkbox and set the smoothing angle to an appropriate value. This will cause the import converter to automatically re-smooth the mesh data with new vertex normals. The smoothing angle type-in determines how smooth, or in opposite cases how faceted, the final mesh will look. If the angle is 90 degrees then the mesh data will look very smooth (no angular corners); if the angle is 0 degrees then there will be many sharp corners and the whole model may look faceted. The default angle is 45 degrees. The default for this option is to have it disabled.
NOTE: The "Weld vertices" checkbox should be enabled for the smoothing algorithm to work properly. The mesh data must be completed welded together for smoothing to occur across polygon edges.
Flip Model to that "Y" is "Up"
If this checkbox is enabled then the model will be reoriented so that the "Up" axis of the model will be aligned with the positive Y axis (which is used by the converter) instead of the positive "Z" axis as used by some Inventor files.Create One "Head Light" Per Imported Camera
If this option is enabled (check-marked) then a directional light will be placed at each imported camera location, shining in the direction of view.Use Quick Naming (for faster imports)
If this option is enabled (check-marked) then the import converter does not check whether the current database has objects with the same name as objects being imported from the Inventor or VRML file. This makes import very fast for large scenes, but, if you import multiple Inventor or VRML files into the same database then errors such as "Instance name already exists" will be reported to the error window (because unique names were not created between the multiple Inventor or VRML files).
If you always want multiple-imported Inventor files to have unique names, and so that no conflict errors are reported, disable this option. The default for this option is disabled.
NOTE: this option really does not need to be enabled any more after mid-2000. The internal Okino database naming system has been augmented with a "26-way binary tree" to allow very fast creation of unique names, even when a tremendous number of objects are being fed to the importer.
Report Statistics about the Geometry File
If this option is enabled (check-marked) then statistics about the imported file will be printed after the file has been imported.Transparency Source
In the Inventor or VRML file format specification the transparency of an object can come from one of two sources: either the explicit "Transparency" attribute of a "Material" assigned to an object, or from the alpha channel of a 32-bit RGBA texture map. Deriving the transparency of an object from the alpha channel of a texture map is useful, for example, if you have a bitmap of a window frame and you wish to make the areas of the object where the glass appears be completely or partially transparent - the 8-bit alpha channel of the bitmap can be used to determine which parts of the object will be fully opaque or partially transparent. This capability is really only of use to Okinos "NuGraf Rendering System" software. See the "Alpha Channel Source" options below to see how the alpha channel is actually pulled from the RGB or RGBA texture map.
Unfortunately, it is not always possible for this import converter to determine if the texture map in question indeed has a valid alpha channel, or that the texture map is 32-bit (RGBA format). For this reason, three options are provided on the dialog box to determine how the transparency for the imported Inventor or VRML objects are to be derived:
Follow Inventor Specification
If a 32-bit RGBA texture map has been assigned to an object, then the transparency of that object will be taken from the alpha channel of the texture map. If not, the transparency will be taken from the "Transparency" attribute of the "Material" definition assigned to the object. This is per the Inventor format spefication. If the Inventor importer cannot locate the texture map, or the texture map is not in RGBA format (no alpha channel present), then the transparency of the object will be used instead.Material Transparency
Regardless of whether a texture map with an alpha channel has been assigned to an object or not, the transparency of an object will always be taken from the "Transparency" attribute of the "Material" definition assigned to the objectAlpha Value from Texture Map
Regardless of whether this Inventor importer can locate the texture map or not, or if a texture map does not have an alpha channel, this option will always take the transparency of an object from the alpha channel of its assigned texture map. If no texture maps exists, or no alpha channel exists on the texture map, the object will be fully opaque.Hierarchy Optimizer # 1, Hierarchy Optimizer # 2
These options provide methods to remove redundant hierarchy nodes ("Frames") from the imported Inventor file. Optimzier # 1 removes runs of empty folders, as well as folders with no children. This optimizer is enabled by default since Inventor files tend to have excess grouping nodes in them. Optimizer # 2 is simpler, deleting empty folders which only have 1 geometry object in them. The second optimizer is useful if you batch import a number of Inventor files and find that there are a number of "yellow" folders (one per imported file) with one a single object in each folder.Shading Parameter Modification Combo Boxes
These combo boxes provide hands-on control over how imported material shading parameters should be modified so that the imported model can be rendered nicely in a photo-realistic rendering program. All too often the imported model appears "too ambient" or "too diffuse" resulting in rendered images that are washed out or with no gradual shading effects visible. The two combo boxes and the single numeric type-in box provide you good control over the ambient, diffuse, specular, luminous and reflection shading coefficients imported into PolyTrans/NuGraf, as well as the opacity of the material, its index of refraction (IOR) and Phong shininess value.
The first drop-down combo box selects which of these shading parameters you want to modify. Each shading coefficient has its own operation which can be selected (the second combo box) and an optional numeric type-in value (the third data entry text input). The following describes the various shading parameters that can be controlled:
- Ambient Coefficient: This controls the amount of color reflected from an object based on the ambient light in a scene. A good default value is 0.1 through to 0.3 and ideally ranges from 0.0 to 1.0. Some programs have an ambient shading coefficient parameter (NuGraf/PolyTrans, Electric Image, etc) while others do not (3D Studio). If an export file format does not support an ambient shading coefficient then this value will be multiplied into the ambient shading color itself.
- Diffuse Coefficient: This controls the amount of color reflected from an object based on the direct light shining on it. A good default value is 0.4 and ideally ranges from 0.0 to 1.0. Some programs have a diffuse shading coefficient parameter (NuGraf/PolyTrans, Electric Image, etc) while others do not (3D Studio). If an export file format does not support a diffuse shading coefficient then this value will be multiplied into the diffuse shading color itself.
- Specular Coefficient: This controls the intensity of the highlight color on an object. A good default value is 0.7 and ideally ranges from 0.0 to 5.0. If an export file format does not support a specular shading coefficient then this value will be multiplied into the specular shading color itself.
- Luminous Coefficient: This controls how much color is added directly to an object, irrespective of any light which shines on it (the higher the value, the more the object will appear to glow). In general you should keep this value at 0. If an export file format does not support a luminous shading coefficient then this value will be multiplied into the luminous shading color itself.
- Reflection Coefficient: This controls the ray trace reflectivity of an object. If set to 1.0 then the object will be 100% reflective and if set to 0.0 then the object will not be reflective at all.
- Opacity: This is the inverse of transparency. 0.0 will make the object fully transparent, while at 1.0 the object will be fully opaque.
- Index of Refraction (IOR): This is the ray traced index of refraction of an object. If the value is greater than 1.0 then a ray will refract as it passes from one material to another (as per Snells law), each of different IORs. Ideal ranges are 1.0 through to 3.0.
- Phong Shininess: This controls the width of the specular highlight seen on an object. An ideal range is 6 (very wide) to 300 (very narrow). The default is 32.
For each material shading parameter, several actions can be performed on it during the import process:
- Do Not Import: The shading parameter is not imported at all. No value is imported nor sent to PolyTrans/NuGraf. Thus, the default material shading parameter value (as set inside PolyTrans/NuGraf) will be used instead.
- Import Unchanged: The shading parameter is imported as is, with no change.
- Set and Use Default: The shading parameter is set to some good default value (as determined by the import converter). This default value will be shown in the type-in box.
- Set to Specific Value: The imported shading parameter will be overridden with the user specified value of the numeric type-in box.
- Import and Crop by: The shading parameter is imported and will remain unchanged if it is less than the numeric type-in value shown on the dialog box. If it is greater, then the imported value will be clamped to be no greater than the numeric type-in value. This is a good operation, for example, if you do not wish for the ambient shading coefficient to be greater than 0.3.
- Import and Scale by: The shading parameter is imported and multiplied by the numeric type-in value shown on the dialog box
- Normalize Color and Coefficient: This option only applies for the ambient, diffuse, specular and luminous shading coefficients and their respective RGB colors. This option is a hybrid approach which tries to automatically guess at a proper shading coefficient value given the raw (and corresponding) color imported from the file. As mentioned, the shading coefficient is needed to create nice looking (nicely shaded) images in a photo-realistic rendering program. If this option is chosen, then the specific shading coefficient will be derived directly from the relative intensity of the imported color which corresponds to this shading coefficient (diffuse color for diffuse shading coefficient etc.). For example, if the imported diffuse color is (0.4, 0, 0), which is 40% of full-bright red, then the diffuse shading coefficient will be set to 0.4 and the diffuse color will be modified to be (1, 0, 0). When the new color (1,0,0) and the new shading coefficient (0.4) are multiplied together, it results in the original color imported from the file (0.4, 0, 0). In general you may wish to use the Set and Use Default option to get good rendered results.
Polygon Welding and Merging
This section provides important optimization algorithms which can be applied to the imported triangular meshes. All imported geometry is created as triangular meshes due to the callback mechanisms used in the COIN 3D library; if you wish to turn the meshes into quads or n-sided meshes then the "Merge" option can be enabled.
Weld Vertices + Threshold
If this checkbox is enabled (check-marked) then the vertex welding operation will be applied to all polygon vertices once the Inventor file has been read into memory and the objects created. Vertex welding collapses adjacent vertices which are within a distance less than or equal to the threshold value specified on the dialog box This welding operation should always be enabled if the "Merge Triangles" option is enabled and/or if the "Override vertex normal smoothing" option is enabled. Note that welding of vertices can only occur within a single object and not between different objects. This option is enabled by default.
Threshold Value Type-In
If the distance between two vertices is less than or equal to this number, and the Weld Vertices checkbox is check-marked (enabled) then the two vertices will be collapsed (welded) into one.Weld Texture Coordinates + Threshold
Weld Vertex Colors + Threshold
Weld Vertex Normals + ThresholdThis is similar to the vertex welding operation except that the welding is done on the vertex uv texture coordinates, the vertex colors and/or the vertex normals, respectively. The "Weld vertices" checkbox must be enabled in order for any of these alternative methods to be enabled as well.Merge Triangles & Co-Planar Polygons into Larger Polygons
If this option is enabled (checkmarked) then an algorithm will be invoked which tries to merge multiple polygons into fewer polygons. If two adjacent triangles are nearly co-planar then they will be turned into a quadrilateral, or if a number of adjoining polygons are nearly co-planar then they will be turned into an n-sided concave polygon. The vertices of the adjacent edges must be welded together (shared) for this operation to proceed properly (turn on the "Weld Vertices" option).
If the "Make Only Quads" option is enabled then only quadrilaterals will be made. If disabled then n-sided concave polygons will be possible.
The test for co-planar polygons (polygons which are almost on the same plane as each other) is determined by the "Co-planar angle" type-in box. This value is measured in degrees. Values near 0 will require that adjacent polygons be very much co-planar with each other, while higher values will allow polygons that meet at an angle to be considered. For example, if you have a curved object made of triangles then try setting the angle to 5 ot 10 degrees. Higher values will allow more polygons to be merged.
Selective Loading
Texture Map Extraction OptionsLights
If checkmarked, then lights are loaded in from the Inventor/VRML file.Cameras
If checkmarked, then cameras are loaded in from the Inventor/VRML file.Materials
If checkmarked, then materials are loaded in from the Inventor/VRML file.Texture References
If checkmarked, then references to bitmap texture images (or extracted bitmaps form the imported file) are assigned to the materials as texture references. If disabled, then no texture map references will be found on the material definitions.Vertex Normals
If checkmarked, then vertex normals are loaded in from the Inventor/VRML file.Vertex uv Texture Coordinates
If checkmarked, then uv texture coordinates are loaded in from the Inventor/VRML file.Vertex Colors
If checkmarked, then vertex colors are loaded in from the Inventor/VRML file.Extract images from Inventor files as new texture maps
Inventor files have the capability of embedding raw bitmap data within their ASCII files rather than have the Inventor file reference an external bitmap image. When this occurs, enabling the 'Extact images from Inventor files' will extract the raw bitmap data from the Inventor file and store the bitmaps on disk as stand-alone TIFF files. The resulting TIFF bitmap will also be linked to the imported 3D geometry data as a texture map so that the two align properly during subsequent renderings. If this option is un-checkmarked then no bitmap will be extracted and no texture coordinates will be assigned to the imported 3D data.Display textures when extracting from geometry files
If this option is checked then the image that is embedded within the Inventor file will be displayed while it is being loaded. Note: the picture preview window might hide the import status dialog.Location to store extracted textures:
The two following options specify where the extracted bitmap image(s) that are sembedded within the Inventor files will be stored on disk in TIFF format:Same location as imported Inventor file
The texture images that are stored in the Inventor file will be saved in the same directory as the file being imported. (e.g. if the file is located in c:\inventor\, the images will also will also be stored in c:\inventor\).In this specific directory:
This option allows you to specify a directory where the images are to be stored.Confirm possible texture file overwrite
If the checkbox is enabled then if the extracted TIFF image file already exists on disk a dialog box is displayed to ask the user whether or not to overwrite the file.Strip file path from all bitmap references
When this checkbox is enabled then any filepath prefixed to the imported bitmap images will be removed. This option also applies to the case where the Inventor file makes explicit references to external bitmap files.Replace all texture file paths with this file path:
This option allows an explicit file path to be prepended to each imported bitmap TIFF file. Either this option or the Strip path from all bitmap references can be checked, but not both. This option also applies to the case where the Inventor file makes explicit references to external bitmap files.Alpha Channel Source Options
As described in the 'Transparency Source' combo-box options above, this Inventor import converter can feed the alpha channel of a texture map into the transparency shader channel of an object. This is useful, for example, to make a window frame (texture mapped with the image of a window frame) partially or fully transparency where the glass appears.Several methods are available to pull an alpha channel from a texture map. Sometimes a 8-bit alpha channel is provided with a RGB image (to form a RGBA image), but in other cases you will have to derive an alpha channel through algorithmic means. Many of these options only have significance to Okinos NuGraf Rendering System software.
Alpha Channel Source
This option defines how an alpha channel is derived from texture maps used with the Inventor file. These alpha channels really only have use within Okinos NuGraf Rendering System software for which the alpha channel can be used to make parts of a texture mapped object appear transparent (such as the windows inside a window frame). These options correspond directly to the alpha channel source type in the NuGraf texture definition edit dialog box:Alpha Channel From Image
Use the alpha channel from the 32-bit RGBA input file. If there is no alpha channel then the alpha is assumed to be fully opaque.Chroma key: upper left
Use the upper-left pixel color in the texture image as the chroma-key color. Whereever this color appears in the image, the alpha will be 0 else the alpha will be 255.Chroma key: lower left
Same as previous option, but the chroma key color is taken from the lower- left corner of the texture map image.Alpha Channel always opaque
Dont create any alpha channel matte for the texture images.Invert Alpha Channel
If this checkbox is enabled (check-marked) then the alpha channel computed for the texture image will be inverted prior to its usage in the NuGraf renderer.