

| You are here: Home » Import CAD Formats » AutoCAD-Revit-Navisworks (DWF-3D) |
Support: 905-672-9328 Copyright © 2026 Okino Toronto, Ontario, Canada. |
|
This import converter reads in ASCII XGL formatted files as well as their ZGL compressed equivalents. Triangular mesh data (with vertex normals and vertex uv texture coordinates), basic material properties, embedded texture images and object hierarchy are imported from the XML-style XGL file.
XGL is an ideal file format to move data from various CAD packages into Okino's software for viewing, heavy optimization, visual editing, photo-realistic rendering and of course re-export to almost all major 3D programs which support mesh formats.
One of Okino's core competencies & specialties is in the conversion of super-ultra-massive 3D models to downstream programs which simply cannot handle those models (such as 3ds Max, Cinema-4D, Maya, Unity, Unreal, etc.). A common source for such models are AVEVA PDMS and AVEVA Marine.
The following images are prime examples whereby the Okino customer sourced the data from AVEVA PDMS and then utilized our PolyTrans conversion + optimization systems to whittle down the dataset before bringing it into 3ds Max for final rendering and animation. Please click on any image to play the extended animation on YouTube.


(please refer to the video for copyright and attribution information)Such conversions can best be done in one of three different methods:
(1) Via the Okino DWF-3D import conversion pipeline. This is one of Okino's most critically important conversion pipelines, written and refined specifically for the import & optimization of these ultra-super-massive models. Such DWF-3D models would first be written out from the AVEVA Review program (whose product brochure can be read online here here).
(2) Via the Okino ZGL import conversion pipeline. This pre-dates our DWF-3D conversion system by a number of years but it is still equally good at handling these large AVEVA models.
(3) A lesser method, which we would not recommend, would be to source DGN files (which have no hierarchy) from AVEVA. Okino has vast experience with dealing with DGN files. However, the problem with DGN datsets is that they often end up being just too complex and massive (DGN files define 'procedural geometry' which has to be interpreted during import through Okino's DGN importer). DWF-3D and ZGL files, on the other hand, are meshed inside of AVEVA PDMS software and thus are a 1:1 representation of the original data.The following WEB page will explain how to achieve such conversions using XGL/ZGL files exported from AVEVA software. To read about how to achieve the same process using DWF-3D files, please refer to this mirror page.
Note: if your destination program "appears" to become very slow to import a ZGL file then contact Okino so that we may change your perception of the process. As a story we often repeat, most people will tend to use the wrong methods to try and import massive models into their favourite destination program, and take "days" to achieve the conversion process. For example, one person spent 8 hours trying to achieve a 200MB ZGL import conversion that we could do in 3 minutes tops. Also, when dealing with large files, please ensure that your "Page swapping" is enabled within Microsoft Windows, otherwise Windows will become incredibly slow when memory starts to get scarce.
The conversion from AVEVA PDMS, using ZGL files, is best done in this manner:
- An AVEVA Review file, RVM extension, is saved out of the AVEVA PDMS software.
- The AVEVA "rvm2zgl.exe" converison program is used to create a ZGL file from the RVM file. ZGL files cannot be exported directly from AVEVA PDMS. AVEVA's 'Review' or AVEVA's 'NET Portal' ship with this "rvm2zgl.exe". AVEVA customers without these products, who wish to use "rvm2zgl.exe", should go through the official AVEVA support channel.
- The specialized Okino ZGL importer is used to import, process and optimize the ZGL file prior to conversion to another file format or import into another downstream 3D program supported by Okino software.
As noted in the help file of the imp_xgl.dll importer, if the imported ZGL file is sluggish to redraw, or just outright massive, then execute the Optimize Number of Objects and Folders command found in the Win menu of the Selector Window, one or more additional times. Okino software has been written since day one to be highly optimized for the import, optimization, display and re-export of very large datasets, such as from oil & gas platforms, oil refineries and 3D plants. This command is the "black magic" of all Okino software which allows it to act as a stepping stone between very large source files and destination programs which cannot handle such data - it is enabled by default on all Okino CAD importers and it is the definitive way to whittle down large 3D Plants or oil & gas factory data.
Background: AVEVA is the world's leading engineering IT software provider to the plant, power and marine industries. AVEVA's products have been proven on some of the world's largest and most demanding engineering projects in the oil & gas, chemicals, power, mining, shipbuilding and pharmaceutical industries. AVEVA PDMS is the Plant Design tool. It is actually a suite of modules and applications, some of which are supplied as a combination of core product optional addons. PDMS has modules for DB Administration, Design, Drafting, Isometric creation, Cats and Specs etc. PDMS Design contains a Piping application, Equipment application, Multi-disciplinary Support (optional addon), etc.
Okino's NuGraf is ideal for creating, importing, editing, and photo-realistic rendering of XGL files. Both, NuGraf and PolyTrans, are fully capable of importing and exporting XGL files.
The following lists some of the limitations of the XGL file format when used as a mechanism to move scene data between 3D software packages:
- XGL file format is not the most ideal for converting 3D scenes with object hierarchy. The main problem is that the "transform" tag does not allow for non-uniform scaling or off-axis scaling to be defined for an objects transformation node. This problem can be overcome by transferring the mesh data in absolute world space coordinates (the transformation matrix is embedded directly with the mesh vertices), but that does not allow for the transfer of any pivoting information.
- All mesh data must be turned into triangles.
- Vertex color and UV tangent attributes for mesh vertices is not provided.
- No naming of objects or null hierarchy nodes is possible.
- All texture maps must be embedded within the XGL file. Texture filename references are not provided.
- Transformations with off-axis scaling or non-uniform scaling are not accomodated.
- Only directional light sources are provided. Point and spot lights are not.
Otherwise, XGL is an adequate file format for moving general purposes triangular-based mesh data between 3D programs, or a 3D program and a destination viewing program, with associated color and texture attributes, some lighting and hierarchy.
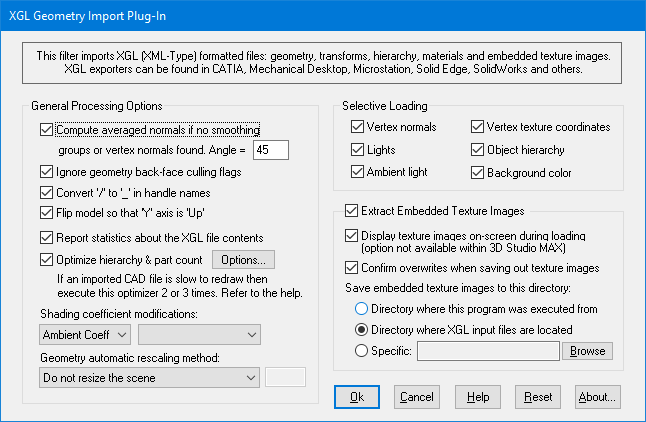
General Processing Options
These options control how the imported geometry and material data is processed before it is sent to the NuGraf/PolyTrans internal database.
Compute averaged normals
If this checkbox is enabled then new vertex normals will be computed for a polygon if it does not have any vertex normals already. The Import Vertex Normals checkbox must also be enabled. The smoothing criterion is based on the angle between abutting polygons; common smoothed vertex normals will be computed if the angle between their geometric surfaces normals is less than the angle specified on the dialog box (which defaults to 45 degrees). Note that the vertices will be welded together prior to the smoothing algorithm being executed.Ignore Geometry Back-face Culling Flags
The XGL file format allows back face culling to be enabled on a per-polygon basis. Culling allows polygon faces, which are pointing towards the camera or away from the camera, to be remove implicitly from a scene during the rendering process. This importer turns these per-polygon flags into a more general per-object culling mode. If this checkbox is enabled then the culling option from the XGL file is ignored.Flip Model so that Y Axis is Up
If this checkbox is enabled then the model will be reoriented so that the Up axis of the model will be aligned with the positive Y axis (which is used by the converter) instead of the positive Z axis as used by some XGL files (such as XGL files exported from the Solid Edge CAD modeling program).Report Statistics About the XGL File Contents
If this checkbox is check-marked then parsing statistics will be displayed in the message window after the XGL file has been imported.Optimize Hierarchy and Part Count
This checkbox enables one of the most important and critical scene processing functions in all of Okino software. It is an integral and core part of any Okino CAD importer, and it has been added to the XGL/ZGL importer for added benefits.The primary purpose of this function is to walk the imported geometry hierarchy and compress together all objects that are parented under a single folder into a one new object. For example, if you import a XGL/ZGL file and find that 200 polygonal objects are grouped under one folder, then enabling this option will cause all such occurrences to collapse the children geometry of each grouping folder into one object.
The documentation for this option can be viewed by pressing the "Options" button and then the "Help" button on the optimizer's dialog box.
If you import a large CAD model, such as an oil refinery or a 3D plant, and find that the redraws + interaction speed is rather slow then go execute this optimizer 2 or 3 more times. You will most likely find that the very slow CAD becomes very fast to redraw. You can invoke this optimizer addition times through the Okino PolyTrans or NuGraf user interface via the "Optimize Number of Objects and Folders" command found in the "Win" menu of the "Selector Window".
Shading Coefficient Modifcations
See below for a longer explanation of these combo boxes. In general, these combo boxes allow the key material attributes to be tweaked during import. This might be necessary, for example, if the imported objects appear too ambient, or too luminous.Geometry Automatic Rescaling Method
This combo box provides access to a useful mechanism which automatically rescales the imported mesh geometry to a size best needed by other 3D software packages. For example, a Solid Edge test file imported into this converter had a size of only 0.05 units across (probably due to the implicit modeling units used within the Solid Edge program); this model was much too small (in extents) for other 3D programs to manipulate properly. To overcome these scaling issues, this combo box can be used to automatically resize any imported model data to a useful size, such as scaled to easily fit inside a box of 2x2x2 raw working units (which is the default). The various options are described as follows:Do Not Resize the Scene
No resizing is done to the imported data.Resize to 1x1x1 units
Resize to 2x2x2 unitsThe model data is automatically scaled up in size, or scaled down in size so that its worldspace extents fits inside a 1x1x1 or 2x2x2 sized unit cube. The latter is the default.Resize to User Defined Absolute Size
The model data is automatically scaled up in size, or scaled down in size so that its worldspace extents fit inside a cube whose size is user defined by the type-in value shown on the dialog box. For example, if you enter the value 20 then the imported data will be resized so that its maximum extent in one or more dimensions is 20 units.Scale Larger by User Defined Factor
Scale Smaller by User Defined FactorThese options allow the imported model data to be scaled larger or scaled smaller by an absolute number. For example, if you select the larger option and enter 10 into the type-in box, then the imported model will be scaled 10 times larger during the import process.Selective Loading
These options allow specific portions of the XGL file to be imported.
Vertex Normals
If checkmarked, vertex normals will be imported for each object. XGL files contain vertex normals which are used to make the imported object appear smooth when shaded.Lights
If checkmarked, directional lights will be imported with an associated color.Ambient Light
If checkmarked, the ambient light source color will be imported and used to replace the color of the current ambient light source.Vertex Texture Coordinates
If checkmarked, vertex uv texture coordinates will be imported for each object. These texture coordinates (if provided) are necessary in order for 2d bitmap textures to be applied to objects.Object Hierarchy
If checkmarked, the object hierarchy will be recreated from the embbed XML tags of the XGL file.Background Color
If checkmarked, the background color will be imported from the XGL file.Extract Embedded Texture Images
Since XGL files are designed for transmitting 3D data to a viewing program, all texture maps are embedded directly within the XGL file (no texture file references are possible). This converter extracts these embedded images and stores them on disk as TIFF files to the directory specified by the Save Embedded Texture Images to this Directory option described below.
Display texture on-screen during loading
If this checkbox is enabled then the extracted bitmap images will be displayed in a window while the file is being loaded.Confirm overwrites when saving out texture images
If this checkbox is enabled then the program will first confirm whether a texture file (which is being extracted from the XGL file and saved to disk) should be overwritten. If the user does not want the file, which already exists on disk, to be overwritten then the converter will skip it. If this checkbox is not enabled then any potential file overwrites will not be confirmed.Save Embedded Texture Images to this Directory
These radio buttons define the directory where the extracted TIFF images will be saved to disk.Directory where this program was executed from
The extracted TIFF images will be saved in the directory where this program began execution (which is usually the same as where this program is located on disk). This is not a preferrable option since this directory will eventually become cluttered with TIFF images extracted from XGL files.Directory where XGL input files are located
The extracted TIFF images will be saved in the same directory where the XGL input file was read from. This is the default but in general you should store the TIFF files in a common textures directory.Specific (+Browse button)
The extracted TIFF images will be saved in the directory indicated by the type-in edit box. If no directory is shown, or you want to change the current output directory, then the Browse button can be pressed to select the desired destination directory.Shading Parameter Modification Combo Boxes
These combo boxes provide hands-on control over how imported material shading parameters should be modified so that the imported model can be rendered nicely in a photo-realistic rendering program. All too often the imported model appears "too ambient" or "too diffuse" resulting in rendered images that are washed out or with no gradual shading effects visible. The two combo boxes and the single numeric type-in box provide you good control over the ambient, diffuse, specular, luminous and reflection shading coefficients imported into PolyTrans/NuGraf, as well as the opacity of the material, its index of refraction (IOR) and Phong shininess value.
The first drop-down combo box selects which of these shading parameters you want to modify. Each shading coefficient has its own operation which can be selected (the second combo box) and an optional numeric type-in value (the third data entry text input). The following describes the various shading parameters that can be controlled:
- Ambient Coefficient: This controls the amount of color reflected from an object based on the ambient light in a scene. A good default value is 0.1 through to 0.3 and ideally ranges from 0.0 to 1.0. Some programs have an ambient shading coefficient parameter (NuGraf/PolyTrans, Electric Image, etc) while others do not (3D Studio). If an export file format does not support an ambient shading coefficient then this value will be multiplied into the ambient shading color itself.
- Diffuse Coefficient: This controls the amount of color reflected from an object based on the direct light shining on it. A good default value is 0.4 and ideally ranges from 0.0 to 1.0. Some programs have a diffuse shading coefficient parameter (NuGraf/PolyTrans, Electric Image, etc) while others do not (3D Studio). If an export file format does not support a diffuse shading coefficient then this value will be multiplied into the diffuse shading color itself.
- Specular Coefficient: This controls the intensity of the highlight color on an object. A good default value is 0.7 and ideally ranges from 0.0 to 5.0. If an export file format does not support a specular shading coefficient then this value will be multiplied into the specular shading color itself.
- Luminous Coefficient: This controls how much color is added directly to an object, irrespective of any light which shines on it (the higher the value, the more the object will appear to glow). In general you should keep this value at 0. If an export file format does not support a luminous shading coefficient then this value will be multiplied into the luminous shading color itself.
- Opacity: This is the inverse of transparency. 0.0 will make the object fully transparent, while at 1.0 the object will be fully opaque.
- Phong Shininess: This controls the width of the specular highlight seen on an object. An ideal range is 6 (very wide) to 300 (very narrow). The default is 32.
For each material shading parameter, several actions can be performed on it during the import process:
- Do Not Import: The shading parameter is not imported at all. No value is imported nor sent to PolyTrans/NuGraf. Thus, the default material shading parameter value (as set inside PolyTrans/NuGraf) will be used instead.
- Import Unchanged: The shading parameter is imported as is, with no change.
- Set and Use Default: The shading parameter is set to some good default value (as determined by the import converter). This default value will be shown in the type-in box.
- Set to Specific Value: The imported shading parameter will be overridden with the user specified value of the numeric type-in box.
- Import and Crop by: The shading parameter is imported and will remain unchanged if it is less than the numeric type-in value shown on the dialog box. If it is greater, then the imported value will be clamped to be no greater than the numeric type-in value. This is a good operation, for example, if you do not wish for the ambient shading coefficient to be greater than 0.3.
- Import and Scale by: The shading parameter is imported and multiplied by the numeric type-in value shown on the dialog box
- Normalize Color and Coefficient: This option only applies for the ambient, diffuse, specular and luminous shading coefficients and their respective RGB colors. This option is a hybrid approach which tries to automatically guess at a proper shading coefficient value given the raw (and corresponding) color imported from the file. As mentioned, the shading coefficient is needed to create nice looking (nicely shaded) images in a photo-realistic rendering program. If this option is chosen, then the specific shading coefficient will be derived directly from the relative intensity of the imported color which corresponds to this shading coefficient (diffuse color for diffuse shading coefficient etc.). For example, if the imported diffuse color is (0.4, 0, 0), which is 40% of full-bright red, then the diffuse shading coefficient will be set to 0.4 and the diffuse color will be modified to be (1, 0, 0). When the new color (1,0,0) and the new shading coefficient (0.4) are multiplied together, it results in the original color imported from the file (0.4, 0, 0). In general you may wish to use the Set and Use Default option to get good rendered results.