| You are here: Home » Import CAD Formats » NGRAIN's 3KO Solutions |
|
All Softimage-3D model geometry is stored on disk in a file format that uses the ".hrc" file extension. This same file can also store hierarchy information, materials and texture references; however, it cannot store cameras or lights. Files saved in the .hrc file format can be read into Softimage as an "element" or read into any other 3D program which can recognize .hrc files (such as Okino's NuGraf):
To export all geometry in the current scene to a .hrc file:
- Choose the 'Export 3D Geometry/Softimage' menu item
- Disable the 'Output Softimage Scene File' dialog box option.
- Enable the 'Write files to a new sub-directory' if you want the file(s) saved to a new unique directory.
- Press the "OK" button on the dialog box.
Once the file has been exported it can be imported into Softimage using these steps:
- Choose the "Get/Element" menu item
- Change to the directory where the .hrc was saved
- Choose "Load".
This export converter has a special feature that allows it to output the current scene to a Softimage database. This section explains what a Softimage database is and how files can be exported to it.
Softimage uses a complex project maintenance system called a "database". A database is basically a directory that contains a number of other sub-directories specific to the current project. These sub-directories contain the model .hrc files (the 'models' directory), bitmap image files in the .pic format (the 'pictures' directory), information about lights (the 'lights' directory), information about the current camera (the 'cameras' directory), contents of the current scene (the 'scenes' directory) and so forth.
Rather than output a .hrc file to a specific directory (as is done with the first export technique outlined above), this converter hands-off a complete description of the scene-to-be- exported to Softimage which in turns break apart the scene and stores the various elements (geometry, lights, cameras, etc) in the current database's sub-directories.
Thus, to export a scene to a Softimage database all you have to do is specify the location of the current database and a name for the new scene. The process is explained as follows:
- Choose the 'Export 3D Geometry/Softimage' menu item from the main program's menu bar.
- Enable the 'Output Softimage Scene File' dialog box option.
- Optionally change the "Location of Softimage resource directory" filepath shown on the dialog box (see below for an explanation).
- Optionally change the "Location of DatabaseDir.rsrc database file" shown on the dialog box (see below for an explanation). This file contains the list of your personal Softimage database names.
- Choose a database from the 'Database Name' drop-down combo box. The scene file will be written to this database. You can either write to a System-Level database (owned by all users) or a personal Local-Level database.
- Press the "OK" button on the dialog box.
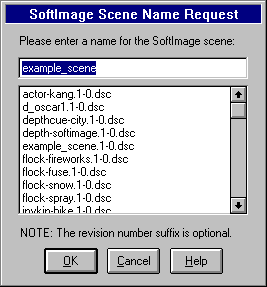
- The following requestor dialog box will then appear. Enter a name for the scene or choose one of the names shown in the list box.

Once the file has been exported it can be imported into Softimage using these steps:
- Choose the "Get/Scene" menu item
- When the Softimage file selector appears click on the scene filename you specified above. If there are multiple revisions of this scene then choose the scene name with the largest revision number.
- Click the "Load" button.
- NOTE: If the scene name does not appear in the Softimage file selector then you will have to change to the database where the scene file was saved (click on the ".." line in the file selector and choose a new database).
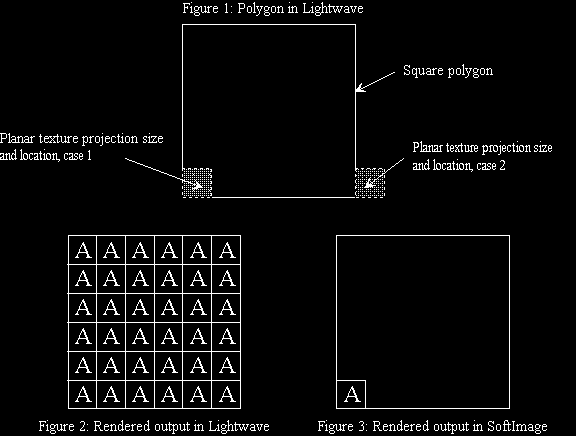
When transferring (u,v) texture coordinates to Softimage from other 3d packages (most notably 3D Studio and Lightwave), it is imperative that you understand the following restriction imposed by Softimage so that your textured mapped objects appear similar in both packages. To explain this restriction please refer to the three diagrams below. In the top-most Diagram # 1 we have a square polygon that has been created in Lightwave. We would like to apply a texture map to this polygon which repeats 6 times in both directions (this texture map is represented by the single letter "A" in these diagrams). To do this in Lightwave we enable a "Planar Image Map" in the polygon's associated surface (for example, in the diffuse texture panel of a surface) and set its size and location as show in Diagram # 1 (case # 1); we also enable the "Width Repeat" and "Height Repeat" checkboxes so that the texture map will repeat indefintely across the polygon. (continued below).

If this polygon is rendered in Lightwave then the polygon will appear as in Diagram # 2; notice that the "A" has repeated 6 times in both directions. However, if the same polygon is exported to Softimage and rendered the polygon will appear as in Diagram # 3. Notice that the letter "A" has repeated only once. This is caused by an inherent limitation of how Softimage handles the repeating of texture maps. The problem is this: Softimage only renders texture maps within a region of a polygon where the (u,v) texture coordinates range from (0,0) to (1,1) while not showing any texture map for values outside this range. This should be compared with other programs (such as 3D Studio, Lightwave and NuGraf) which cause the texture map to repeat indefinitly for values outside the (0,0) to (1,1) range.
The only valid solution to overcome this limitation is this: while in 3D Studio, Lightwave or whatever 3d program you are using, resize the texture projection icon to encompass the entire area of the polygon (or object) that is to appear texture mapped within Softimage (ie: resize the icon shown in Diagram # 1 from its lower-left corner location to encompass the entire polygon). The scene should then be exported to Softimage. Once imported into Softimage edit the texture ("Texture/2D Local") and modify the "U Count" and "V Count" parameters to define how many times the texture map should repeat within the projection icon's area (6 and 6 in this example).
Restriction # 2: You must also be careful to define the texture projection icon inside the polygon to be texture mapped! Many Lightwave scenes have their texture projection icon lying far outside the actual polygon that is to be texture mapped - this is fine since the texture will repeat inself over top of the polygon during the rendering process. This is shown in Diagram # 3 above (case # 2). When imported into Softimage no texture map will appear at all since the (0,0) to (1,1) texture map range is defined outside of the polygon. Please keep this problem in mind when exporting Lightwave scenes to Softimage - if a texture map does not appear where it should then the texture projection icon has been misaligned in Lightwave. Hand editing the texture projection icon's location and size in Lightwave will solve this problem.
Restriction # 3: Be careful when resizing and positioning your projection icon in the source modeling program! Take for example a case where you've sized the planar projection icon to encompass the entire polygon shown in Diagram # 1 above. However, for the sake of this example, you resized the icon slightly smaller than the actual polygon. Due to the fact that this export converter has to round-off all (u,v) texture coordinates to the range (0,0) to (1,1), as expected by Softimage, the smaller projection icon will cause the texture to map from u=0 to u=0.1 (only 10% of the texture map) instead of u=0 to u=1 (100% of the texture map). If Softimage allowed (u,v) texture coordinates to range from -infinity to +infinity (as with other 3d programs) then this would not be a problem; immediate solution from Softimage is available.

