

| You are here: Home » Specialized Sections |
Support: 905-672-9328 Copyright © 2026 Okino Toronto, Ontario, Canada. |

Tutorial: Real World Example Usage of Material Boundary Constraints
![]()
![]()
![]()
This tutorial will show you how the "Material Boundary Preservation" options on the "Weightings" panel of the option dialog box best come to use.
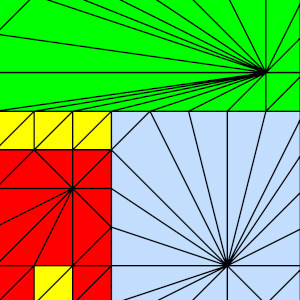
Our basic model is a flat plane composed of 64 quadrilateral polygons. To make this tutorial interesting we have assigned different materials to various polygons of the object as shown here:

These different materials introduce what is termed "material boundaries" to the object. What we want to do is reduce the number of polygons in this object without affecting the resulting color pattern of the object. This means that the polygon reducer must take into account material boundaries, as where adjacent polygons have different material properties.
We will attack this reduction problem by using these settings:
§ On the "Weightings" panel enable the "Lock the vertex positions of vertices on mesh borders" and "Lock the vertex positions of vertices bordering two materials". This will ensure that no outer boundary vertices are moved or deleted, nor any interior vertices which border two different materials.
§ Set the desired polygon reduction amount to 100%. By locking the vertices we know that we will not obtain 100% reduction, so by setting the slider to 100% we will obtain the highest possible reduction possible in this case.
The resulting reduced object had 48% (66) of its 128 polygons removed. This is ok, but not ideal. The resulting model looked like:
You will notice that this is the minimal number of polygons that can be created under the restrictions that no outer boundary or inner material boundary can move.
Now, let's look at the ideal reduction parameters. After pressing the "Reset" button, change the settings to:
§ On the "Weightings" panel set the "Boundary vertex preservation weight" to "1e6" and the "Material preservation weight" to "1e6". This will only allow the vertices to slide along their edges and not away from their edges. These are very high weighting values.
§ Set the desired polygon reduction amount to 100%.
If we run the reducer again we now get 88% (112) of its 128 polygons removed. This is much better! The resulting model looks like:

You can see that this is the minimal number of triangles that can be used to represent the original square shape and the original material coloring; if any more triangles are removed then "T" vertices will be introduced into the dataset
This latter reduction provided nearly twice as much compression because of the fact that we did not enable the "Lock Vertices" checkboxes but rather we just set the weights very high. This allowed the vertices to slide along their edges (and thus allow them to be merged together) whereas in the "Lock" cases no vertices on the borders were allowed to move.
Lessons learnt:
§ If you want to lock vertex and/or border vertices set the "Boundary vertex preservation weight" and/or the "Material preservation weight" type-in values to very high numbers (such as 1e6 or 1e7) rather than enable the "Lock the vertex positions of vertices on mesh borders" and/or "Lock the vertex positions of vertices bordering two materials" check boxes.
See Also:
"Weightings" panel of the option dialog box