

| You are here: Home » Products » PolyTrans|CAD+DCC » 3D File Formats |
Support: 905-672-9328 Copyright © 2026 Okino Toronto, Ontario, Canada. |
The Sunlight studies calculation system orients a directional light source to emulate the geographically correct altitude and azimuth of the sun relative to any point on the Earth's surface at a given time and date. You can manually and graphically specify the time, date and location on the Earth. This is an ideal calculator for performing shadow studies of architectural buildings. As you change the time, date and location (as input parameters) the software will calculate a new direction for the directional light source relative to the XYZ axes of the NuGraf user interface; the light will move along an arc from horizon to horizon.
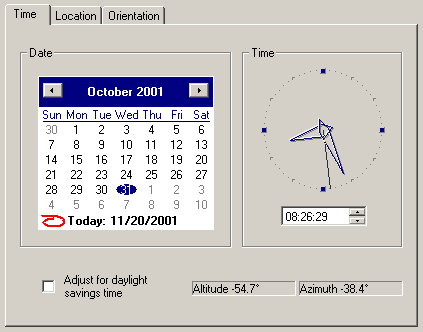
The software will calculate the sun's azimuth and altitude as you change the time, date and location. This is displayed on the first and third panel. Azimuth is the compass direction of the sun in degrees with 0 degrees aligned with the North vector and 90 degrees aligned East. Altitude is the height of the sun above the horizon in degrees (with 0 degrees being the horizon).
NOTE: The time & date display on this dialog boxes requires that the "Analog Clock" OCX control be installed. This is installed automatically when the NuGraf software is installed on your computer. Before installing the analog clock control, you should have at least VB5 SP3 (Visual Basic service pack 3) runtime modules installed. Without them, the installation program will fail to register the ActiveX control. If you wish to manually install this OCX control, copy the "analogclock.ocx" file from the "system" sub-directory where NuGraf is installed on your machine to the main Windows "system32" directory. Go to a DOS command line, change to the Windows "system32" directory and type "regsvr32 analogclock.ocx".
Step by Step Usage Instructions
- Create or edit a 'Directional' light source (see the Light editor dialog box).
- Press the "Sunlight Calculator - Edit" button on the light editor dialogbox.
- When the sunlight system dialog box appears, press the "Enable Sunlight Calculator" checkbox.
- Set the time and date on the "Time" panel for which you wish to perform the sun study.
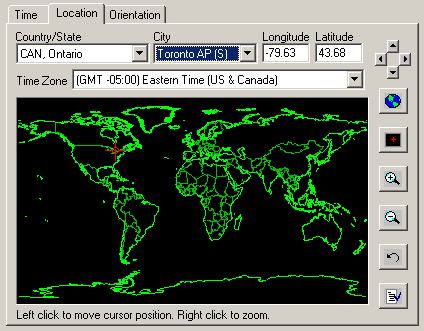
- On the "Location" panel specify the location on the Earth where you wish to perform the sun study relative to.
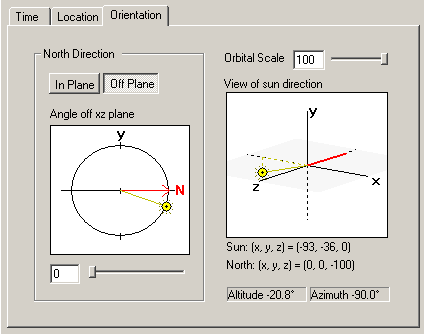
- On the "Orientation" panel you can specify the direction of the red "North" vector. This defines "North" relative to the XYZ axes of the main NuGraf user interface view windows. Once you return to the main NuGraf user interface you will find a red North vector emanating from the directional light source icon. This red vector's direction is set strictly with the " Orientation" panel.
- Press "Ok" to make the sunlight calculator dialog box go away and then press "Update and Exit" to make the light editor go away.
- On the main user interface you will now find that the directional light source to pointed in the direction of the sun at the desired time, date and location relative to the red "North" vector. If you need to modify the time,date, location or North direction then re-enter the Sunlight editor dialog box and repeat the above steps.
The first panel defines the time and date for the sun study. If you wish to perform the sin study during daylight savings time then enable the related named checkbox (this adjusts the sun's azimuth and altitude during the summer months).
The software will calculate the sun's azimuth and altitude as you change the time, date and location. This is displayed on the first and third panel.
Azimuth is the compass direction of the sun in degrees with 0 degrees aligned with the North vector and 90 degrees aligned East. Altitude is the height of the sun above the horizon in degrees (with 0 degrees being the horizon).
The second panel defines the location on the Earth's surface for the sun study. Select from one of three methods:
- Select a country/state and city location from the pull down menus, or
- Click a location on the map of the Earth, or
- Enter explicit Longitude and Latitude values from an atlas.
You will also have to set the "Time Zone" which is the number of hours the location is relative to GMT.
Several buttons are provided to navigate about the world map:
- Left, Right, Up, Down Arrows. Shifts the map in a specific direction when zoomed in.
- Zoom out to encompass the entire world map.
- Center the (zoomed in) map at the current red marker location.
- Zoom into the map.
- Zoom out of the map.
- Undo the last zoom in/out operation.
- Display the view options dialog box.
The "View Options" dialog box specifies which attributes of the map are to be shown (country boundaries, state boundaries, islands, lakes, rivers and/or cities). If you enable the "Snap to nearest city" then the red marker will always jump to the closest city after you click on the map.
The third panel defines the direction to the sun relative to the "North" direction. The North direction is shown in the main NuGraf user interface when the sunlight calculation system is enabled for a directional light source.
The sunlight calculator system computes altitude and azimuth values which are compass directions towards the sun; the azimuth value is computed relative to "true North" on the Earth. However, the NuGraf user interface simply has X, Y and Z 3D axes but no sense of "North". To relate one with the other a red "North" vector has been attached to the directional light source as shown on the NuGraf user interface. Thus, the computed azimuth value will orient the directional light source relative to the red North vector in the user interface.
This third panel simply sets the direction of the North vector and DOES NOT set or modify the direction of the light source. The light direction will be under complete control by the sunlight calculation system.
To change the direction of the North vector in the horizontal XZ plane, press the "In Plane" button and move the slider. To change the direction of the North vector in the vertical XY plane, press the "Off Plane" button and move the slider.
The "orbital scale" button does not do anything of importance other than move the small sun icon closer or farther away from the origin in this third panel.