

| You are here: Home » Import CAD Formats » CATIA v5 |
Support: 905-672-9328 Copyright © 2026 Okino Toronto, Ontario, Canada. |
This panel controls the import of materials and their associated texture maps.
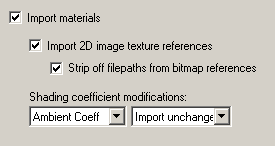
Import materials
This is the global overrides for importing materials. In general, you will want to keep it enabled. If this option is enabled (checkmarked) then materials will be imported and assigned to their respective objects, else no materials will be imported.Import 2D image texture references
If this option is enabled (checkmarked) then any material which references a 2D texture image bitmap, and which is supported by Okino's material-texture shader system, will be imported.If disabled, then all 2D texture image bitmap references will be ignored and no texture mapping will be imported.
This table lists the mapping of the supported CINEMA 4D texture channel types over to their equivalent Okino texture channel types:
CINEMA 4D Texture Channel Type Okino Texture Channel Type Luminance Ambient color Color Diffuse color Specular color Specular color (No equivalence) Luminous color Transparency Opacity Diffusion Diffuse color intensity Reflection Reflected colors intensity Bump Bump Environment Spherical environment map Strip off filepaths from bitmap references
If this option is enabled (checkmarked) then any file path which is prefixed to a bitmap texture's disk filename will be removed.Shading Parameter Modification Combo Boxes
These combo boxes provide hands-on control over how imported material shading parameters should be modified so that the imported model can be rendered nicely in a photo-realistic rendering program. All too often the imported model appears "too ambient" or "too diffuse" resulting in rendered images that are washed out or with no gradual shading effects visible. The two combo boxes and the single numeric type-in box provide you good control over the ambient, diffuse, specular, luminous and reflection shading coefficients imported into PolyTrans/NuGraf, as well as the opacity of the material, its index of refraction (IOR) and Phong shininess value.
The first drop-down combo box selects which of these shading parameters you want to modify. Each shading coefficient has its own operation which can be selected (the second combo box) and an optional numeric type-in value (the third data entry text input). The following describes the various shading parameters that can be controlled:
- Ambient Coefficient: This controls the amount of color reflected from an object based on the ambient light in a scene. A good default value is 0.1 through to 0.3 and ideally ranges from 0.0 to 1.0. Some programs have an ambient shading coefficient parameter (NuGraf/PolyTrans, Electric Image, etc) while others do not (3D Studio). If an export file format does not support an ambient shading coefficient then this value will be multiplied into the ambient shading color itself.
- Diffuse Coefficient: This controls the amount of color reflected from an object based on the direct light shining on it. A good default value is 0.4 and ideally ranges from 0.0 to 1.0. Some programs have a diffuse shading coefficient parameter (NuGraf/PolyTrans, Electric Image, etc) while others do not (3D Studio). If an export file format does not support a diffuse shading coefficient then this value will be multiplied into the diffuse shading color itself.
- Specular Coefficient: This controls the intensity of the highlight color on an object. A good default value is 0.7 and ideally ranges from 0.0 to 5.0. If an export file format does not support a specular shading coefficient then this value will be multiplied into the specular shading color itself.
- Luminous Coefficient: This controls how much color is added directly to an object, irrespective of any light which shines on it (the higher the value, the more the object will appear to glow). In general you should keep this value at 0. If an export file format does not support a luminous shading coefficient then this value will be multiplied into the luminous shading color itself.
- Reflection Coefficient: This controls the ray trace reflectivity of an object. If set to 1.0 then the object will be 100% reflective and if set to 0.0 then the object will not be reflective at all.
- Opacity: This is the inverse of transparency. 0.0 will make the object fully transparent, while at 1.0 the object will be fully opaque.
- Index of Refraction (IOR): This is the ray traced index of refraction of an object. If the value is greater than 1.0 then a ray will refract as it passes from one material to another (as per Snells law), each of different IORs. Ideal ranges are 1.0 through to 3.0.
- Phong Shininess: This controls the width of the specular highlight seen on an object. An ideal range is 6 (very wide) to 300 (very narrow). The default is 32.
For each material shading parameter, several actions can be performed on it during the import process:
- Do Not Import: The shading parameter is not imported at all. No value is imported nor sent to PolyTrans/NuGraf. Thus, the default material shading parameter value (as set inside PolyTrans/NuGraf) will be used instead.
- Import Unchanged: The shading parameter is imported as is, with no change.
- Set and Use Default: The shading parameter is set to some good default value (as determined by the import converter). This default value will be shown in the type-in box.
- Set to Specific Value: The imported shading parameter will be overridden with the user specified value of the numeric type-in box.
- Import and Crop by: The shading parameter is imported and will remain unchanged if it is less than the numeric type-in value shown on the dialog box. If it is greater, then the imported value will be clamped to be no greater than the numeric type-in value. This is a good operation, for example, if you do not wish for the ambient shading coefficient to be greater than 0.3.
- Import and Scale by: The shading parameter is imported and multiplied by the numeric type-in value shown on the dialog box
- Normalize Color and Coefficient: This option only applies for the ambient, diffuse, specular and luminous shading coefficients and their respective RGB colors. This option is a hybrid approach which tries to automatically guess at a proper shading coefficient value given the raw (and corresponding) color imported from the file. As mentioned, the shading coefficient is needed to create nice looking (nicely shaded) images in a photo-realistic rendering program. If this option is chosen, then the specific shading coefficient will be derived directly from the relative intensity of the imported color which corresponds to this shading coefficient (diffuse color for diffuse shading coefficient etc.). For example, if the imported diffuse color is (0.4, 0, 0), which is 40% of full-bright red, then the diffuse shading coefficient will be set to 0.4 and the diffuse color will be modified to be (1, 0, 0). When the new color (1,0,0) and the new shading coefficient (0.4) are multiplied together, it results in the original color imported from the file (0.4, 0, 0). In general you may wish to use the Set and Use Default option to get good rendered results.