

| You are here: Home » Import CAD Formats » PRC and 3D PDF |
Support: 905-672-9328 Copyright © 2026 Okino Toronto, Ontario, Canada. |
|
This import wizard and converter reads in multiple file formats which contains 3D points and point clouds. It provides much flexibility to import many variations of point cloud data in various columnar layouts.See also the corresponding 3D points file exporter and the succinct overview of all supported 3D points import/export file formats (and related notes).
Supported 3D Points & Point Cloud Import File Formats Custom Custom 'selectable' parsing: XYZ, RGB, XYZRGB, XYZI, XYZIRGB, XY This point file importer has a powerful and flexible mechanism for you to program your own 3D point file importer. Please refer to the explaination further below. 3PI ShapeGrabber 3PI file Native file format for ShapeGrabber 3D point scanning software. ASC ASCII digitizer point file One set of points per line, each number delimited by spaces. CSV Comma separated data (import from spreadsheets) .csv files are easily imported from most spreadsheet programs, including Microsoft Excel. It is the best and simplest method to get columnar data exported from a spreadsheet. NPTS.TXT N-PTS 3D point file Ignores the first line, then parses remaining lines (delimited by spaces) PRN Space delimited data One set of points per line, each number delimited by spaces. PTS PTS 3D point file PTS is a very common 3D points file format (the first 2 lines will be ignored) TXT Tab delimited data One set of points per line, each number delimited by tabs. XYZ XYZ 3D point per line One set of XYZ points per line, arbitrary number delimiters. XYZRGB XYZ 3D point and RGB color per line One set of XYZ points and RGB colors per line, arbitrary number delimiters. NOTES:
- After import, you can turn a collection of 3D points into a 3D renderable mesh via Okino's "3D point cloud to mesh converter" found in the Edit or Geometry main menus.
- CSV files can't have values that are intended to be considered "one row of data" to be split across multiple rows.
- Each row must have the same number of columns of data.
A well developed but little known aspect of Okino software is its end-to-end support for the conversion of 3D point files and point cloud data files. This sub-pipeline allows 3D point file data to be imported then exported into a succinct set of industry standard point file formats as well as into a series of common and generic 3D file formats (as outlined in the tables below):
3D Importer Modules With Point Cloud Support 3DM OpenNURBS & Rhino-3D DGN Microstation DGN DWF Autodesk, AVEVA & Others HSF HOOPS HSF (Similar to DWF-3D) IGS, IGES IGES (Okino v5.3 Importer) OBJ Wavefront OBJ+MTL PLY Stanford PLY SHP ESRI ShapeFiles U3D Universal 3D
3D Exporter Modules With Point Cloud Support 3DM OpenNURBS & Rhino-3D DGN Microstation DGN DWF Autodesk, AVEVA & Others DXF, DWG AutoCAD Compatible HSF HOOPS HSF (Similar to DWF-3D) IGES IGES Neutral CAD Format JT 'JT Open' PLM/CAD Format OBJ Wavefront OBJ+MTL PLY Stanford PLY TXT Okino Scene 'Text Dumper' U3D Universal 3D (for 3D PDF files) WRL, X3D VRML2, VRML2 Classic & X3D
- Note 1: Each of the 3D exporter modules listed in the previous table will only output the 3D point lists from a 'Point Set' primitive and not from polygon meshes, NURBS, curves or polylines data. In other words, you need to import a 3D point set dataset only (and not 3D polygon meshes, NURBS surfaces or polyline data) before exporting into one of the 3D exporter file formats listed in the table above or one of the dedicated 3D point file export file formats. For example, if the current 3D scene contains a sphere then exporting to any of the file formats listed in the previous table will output a 3D sphere (as a polygon mesh) and not a simple 3D point file. On the flip side, the dedicated 3D point file exporters can output 3D point sets from any source geometry, be they point sets, meshes, polylines or NURBS - refer to the Output points from these primitives option defined on the exporter's documentation page.
- Note 2: Contrary to the prior paragraph, you can have an entire scene exported to a 3D point file (regardless if the scene uses any combination of 3D points, 3D polygon meshes, NURBS surfaces or polyline data) by exporting to the PLY file format and choosing the "Output all mesh data as 3D point sets" export option.
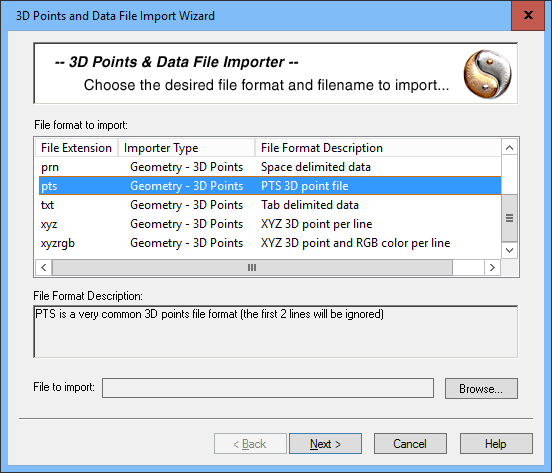
This panel provides selection of the desired file format to import and the filename to load from disk. To reset the options to the default state press the "Reset Options" button on panel # 3.
You should:
- Choose an appropriate 3D file format from the list box to use for loading the data.
- Choose a corresponding and appropriate filename from disk by pressing the "Browse " button.
This panel specifies the options which control the parsing of the source 3D points or data file. Typically these options will be preset for you and no changes will be necessary. To reset the options to the default state press the "Reset Options" button on panel # 3.
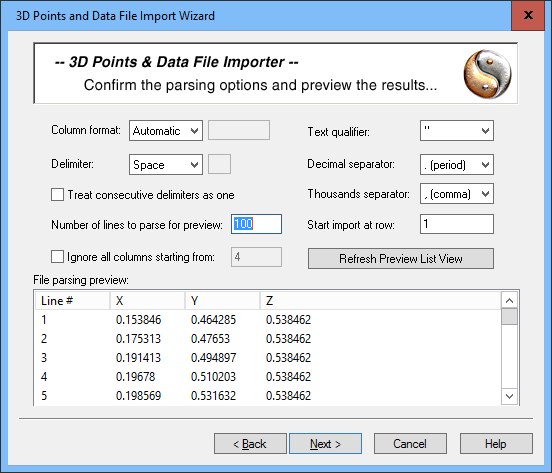
Column Format
This combo box allows you to specify how the numeric data is defined in the source import file.For example, if each line looks like "0.0 1.0 2.0 0.1 0.2 0.3" then you could specify the "XYZRGB (normalized colors)" option, as the first 3 numbers are probably the XYZ point coordinates and the next 3 numbers are the RGB colors.
The default is "Automatic Guess" in which case the importer tries to choose the best column format by itself.
Custom
This option will allow you to "program" the importer to your own column format specification. You need to enter the desired format into the type-in box.For example, if you type in the string "RGBXYZ" then the importer will consider each line in the source file to be defined as 3 normalized RGB colors followed by 3 XYZ point coordinates.
Or, if you type in "IrgbZYX" then the importer will consider the first coordinate of each line to be an intensity value, followed by 3 RGB colors (in integer format), followed by the point coordinates in the order Z, Y and then X.
** The custom string must have at least the XYZ parameters specified.
The valid characters for the custom string, and their meanings, is as follows:
- X - X coordinate point, in floating point format
- Y - Y coordinate point, in floating point format
- Z - Z coordinate point, in floating point format
- R - Red color component, in normalized floating point format (0.0 to 1.0)
- G - Green color component, in normalized floating point format (0.0 to 1.0)
- B - Blue color component, in normalized floating point format (0.0 to 1.0)
- r - Red color component, in integerized format (0 to 255)
- g - Green color component, in integerized format (0 to 255)
- b - Blue color component, in integerized format (0 to 255)
- I - A general intensity value, in floating point format (see "I" explanation below).
- 1 .. 9 - Generic attribute data for each point. For example, if each point has a date string associated with it (between quotes) then you could specify "1" in the custom string. The data will then be imported as custom attribute data along with the points. You have 9 possible custom parameters numbered 1 through 9. For example, if the custom string is "XYZ12" then the importer will assume each line consists of 3 XYZ values followed by 2 custom data values.
Automatic Guess
Choosing this combo box option will cause the importer to attempt to select the most appropriate column format for the current file format. This is the default option.The automatic guess will be based solely on the number of columns found in the source data:
# of Columns Chosen Column Format 1 X 2 XY 3 XYZ 4 XYZI 6 XYZrgb 7 XYZIrgbIf the number of columns is 5 then the first 3 columns will be imported as XYZ values and the last 2 columns imported as two Generic attribute data arrays.
If the number of columns is greater than 7 then the first 6 columns will be imported as XYZrgb and the remaining columns as Generic attribute data arrays.
The colors will initially be assumed to be integerized (0..255). If any of the color values range from 2 to 255 then all the colors will be renormalized into the range of 0.0 to 1.0.
XYZ
Each row of the source file must have 3 numeric fields defining the X, Y and Z coordinates of the 3D point.XYZRGB (normalized colors)
Each row of the source file must have 6 numeric fields with the first 3 defining the X, Y and Z coordinates of the 3D point followed by the point's R, G and B normalized color (red, green and blue. The RGB values must be normalized, meaning that the values lie between 0.0 and 1.0.XYZIRGB (normalized colors)
This is the same as the previous "XYZRGB" option except that an additional intensity value "I" is specified between the XYZ and RGB values on each line of the file.The "I" intensity value is often used by optical 3D scanners to measure the energy reflected by the surface: Values near 0.0 correspond to low energy (dark parts of the model) whereas large values correspond to bright areas of the model.
XYZrgb (integer colors)
This is the same as the previous "XYZRGB" option except that the RGB colors are specified using integers and not normalized floating point numbers. Each color component is measured from 0.0 (dark) to 255 (full intensity). For example, white would be specified as "255 255 255".XYZIrgb (integer colors)
This is the same as the previous "XYZIRGB" option except that the RGB colors are specified using integers and not normalized floating point numbers. Each color component is measured from 0.0 (dark) to 255 (full intensity). For example, white would be specified as "255 255 255".XYZI
Each row of the source file must have 4 numeric fields with the first 3 defining the X, Y and Z coordinates of the 3D point followed by an intensity value.The "I" intensity value is often used by optical 3D scanners to measure the energy reflected by the surface: Values near 0.0 correspond to low energy (dark parts of the model) whereas large values correspond to bright areas of the model.
XY
Each row of the source file must have 2 numeric fields defining the X and Y coordinates of the 3D point. The Z value will be assumed to be zero.Delimiter
This combo box determines how each number is delimited from each other on one line of the source import file (when the file is ASCII).Custom
The delimiter character is specified by you in the type-in box. Any single, valid ASCII character can be entered.Comma
Each number is separated from the next one by a comma.Semicolon
Each number is separated from the next one by a semi-colon.Space
Each number is separated from the next one by one or more spaces.Tab
Each number is separated from the next one by a tab.Treat Consecutive Delimiters as One
If this checkbox is enabled then the importer will combine multiple delimiters into one. For example, if the source file has a line that looks like "255,,, 255, 255" then the 3 commas will be combined into one.However, this option is disabled by default since in reality the extra delimiters could define real numbers which don't exist in the file. For example, again with the "255,,, 255, 255" example, the program which wrote this file could actually have wanted zeros to be written to the file where the multiple commas are defined, like this "255, 0.0, 0.0, 255, 255", but it decided not to write the zeros to save space and compress the file size.
It will be up to you to decide if this option should be enabled or not. Examining the source file should provide the answer as to whether the option should be enabled.
Number of Lines to Parse For Preview
The bottom of this wizard panel shows a preview list box. It shows you what data will be parsed and imported based on the current parsing options chosen on this wizard panel. The "Number of lines to parse" determine how many lines in the source file will be examined, parsed and added to the preview list box.Ignore all Columns Starting from #
If this checkbox is enabled then a specific range of columns from the source file will be ignored. For example, if the source data has 6 columns (XYZ and RGB), and the type-in box is set to 4, then the RGB values will be ignored (columns 4 and higher).The type-in box describes the first and subsequent columns which are to be ignored.
Text Qualifier
This combo box determines which character in the source file surrounds each number. Typically there will not be any qualifier around numbers.Examples:
1.0, 1.0, 1.0 "1.0", "1.0", "1.0" '1.0', '1.0', '1.0'Double Quote
The number is surrounded with a double quote character, such as "1.0", "1.0", "1.0".Single Quote
The number is surrounded with a single quote character, such as '1.0', '1.0', '1.0'.{None}
The number is not surrounded with any characters. This is the default.Decimal Separator
The combo box determines which character will be used as a decimal place in each floating point number. In North America this is often the period "." and in Europe this is often the comma ",". The default is the period.Thousands Separator
The combo box determines which character will be used as a thousands separator in each floating point number. In North America this is often the comma ",". The default is the comma.Start Import at Row
This type-in box determines which row of the source file to begin the parsing process. Normally this would be row 1, the first row.Refresh Preview List View
If this button is pressed then the source file will be re-parsed and its contents displayed in the "File parsing preview" list view at the bottom of the panel. The parsing will be done using the options specified on the current wizard panel.
This panel controls how the 3D points will be imported into the internal database and whether any processing should be done on those points. To reset the options to the default state press the "Reset Options" button.
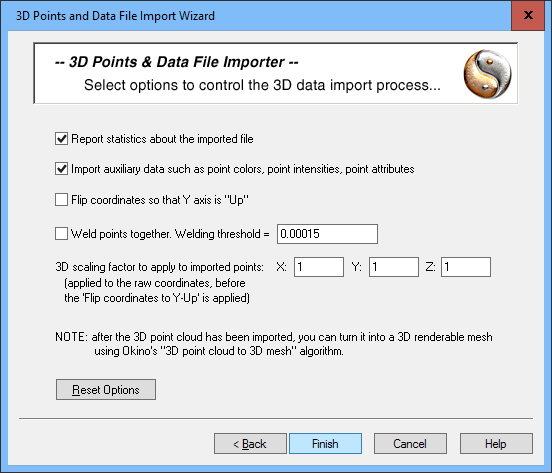
Report Statistics About the Geometry File
If this checkbox is enabled then the import converter will print out the number of points and auxiliary data points that were parsed from the file.Import auxiliary data such as point colors, point intensities, point attributes
If this checkbox is enabled then importer will try to parse and import auxiliary data elements which are found in the file such as point colors, point intensities, etc.Flip Coordinates so that Y Axis is "Up"
If this checkbox is enabled then the points will be reorientated so that the "Up" axis of the points will be aligned with the positive Y axis (which is used by the converter) instead of the positive "Z" axis.Weld Points Together, Threshold = #
If this option is enabled then points which are close together in 3D space will be combined together into single points, thus removing redundancy from the imported point set.Threshold Value Type-In
If the distance between two points is less than or equal to this number then the two points will be collapsed (welded) into one.3D Scaling Factor to Apply to Imported Points (XYZ)
This is a scaling factor that can be applied to the imported points to make them larger or smaller in the X, Y and Z dimensions. Uniform values less than 1.0 will make the imported point cloud smaller, while values greater than 1.0 will make the point cloud larger. You may find that terrain models are too large in one dimension, so you can use this scaling factor to re-scale the data during the import phase.NOTE: the scaling is applied to the data before the optional re-orientation is done via the "Flip Coordinates so that Y Axis is Up". In other words, the scaling is applied to the original XYZ values from the source file.