

| You are here: Home » Products » PolyTrans-for-3ds Max |
Support: 905-672-9328 Copyright © 2026 Okino Toronto, Ontario, Canada. |

PolyTrans-for-Director is a native Xtra plug-in system for Adobe Director that allows Director to import (from within the Director user interface) 3D scene data of most other 3D software packages and file formats, such as 3ds Max (via PolyTrans-for-MAX and Okino .bdf format), Maya (via PolyTrans-for-Maya and Okino .bdf format), Autodesk Inventor, CATIA v4, CATIA v5, ESRI, IGES, Collada, DirectX, DXF/DWG, FBX, Lightwave, OpenFlight, PARASOLID, PLY, ProE/Creo, SketchUp, Solid Edge, SolidWorks, STEP, U3D, VRML1+2+X3D, Wavefront OBJ and many others.
Unlike the sister PolyTrans-for-MAX and PolyTrans-for-Maya native plug-in systems which execute PolyTrans entirely inside MAX or Maya, this PolyTrans-for-Director plug-in system runs PolyTrans as an "out of process server". In essense, PolyTrans-for-Director is a "front end controller" that coordinates the back-end server processes that convert various 3D file formats to/from the Shockwave-3D .w3d file format; the .w3d files are then imported within the Director user interface. This is explained in better detail in the next section.
PolyTrans-for-Director works in any version of Directory from v8.5 onwards, including Director 2004 and Director v11.
To install a demo version of PolyTrans-for-Director:
- Install a demo or commercial copy of Adobe Director from Adobe.
- Visit the Okino demos download page
- Download and install the stand-alone PolyTrans or NuGraf demo program (one installer)
- Download and install the "Okino Super Installer", demo version. Execute it and choose the "PolyTrans for Director" plug-in system. It should automatically detect the installation path of Adobe Director on your machine (or the older Macromedia Director 8.5).
- PolyTrans-for-Director will appear in the "Xtras" menu of Adobe Director.
Okino's PolyTrans-for-Director works very differently, behind the scenes, than any other current Okino product. Internally it is highly dependent upon Microsoft's "COM" client/server technology (previously known as OLE).
Internally, within Adobe Director, the file process will appear to operate quite simply:
- You select the "PolyTrans 3D Importers" plug-in from the "Xtras" menu inside Director.
- The "PolyTrans-for-Director" dialog box and list box appears.
- You click on one of the import converters and select the desired file to load.
- Several status dialog boxes appear while the file is being imported.
- The "PolyTrans-for-Director" dialog box goes away and you are left with a new 3D member added to the current Director cast.
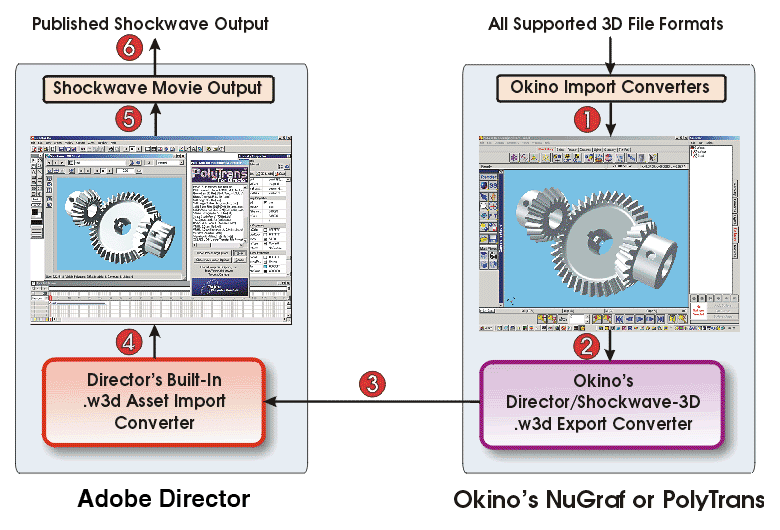
However, in the background, the process is actually more complex. Understanding this process will help you comprehend the overall conversion pipeline. The key point to consider is that the conversion processes are actually handled by the stand-alone Okino PolyTrans or NuGraf software, via its exposed PolyTrans!ProServer interface, under control of the Xtra plug-in within Director
During an import to Director, the stand-alone PolyTrans or NuGraf software (run as a hidden COM server) imports the desired source 3D file and writes it out to a temporary Shockwave-3D .w3d file in the Windows TEMP directory. This intermediate file is then read into Director where it is displayed. This process is made transparent to you.
While the 3D data is passing between the PolyTrans import converters and the Director program a number of powerful geometry and scene processing operations can be applied to all the data:
These processing functions allow the PolyTrans-for-Director user to easily and automatically apply all of the common stand-alone PolyTrans geometry and scene processing functions but without having to execute them by hand or work in the stand-alone PolyTrans software itself.
Alternatively, if you do not want to use this automatic system you could import a file into the stand-alone PolyTrans, perform the processing operations by hand, then export out a Shockwave-3D .w3d file to be imported into Director.
![[Options]](/images/pt4director_options.gif)
Cast Member Linking Method
Adobe Director is based on the concept of a movie containing one or more casts (like a group of human actors), and each cast having 1 to 32000 cast members. The cast members are 3D objects, text, bitmaps, etc. For the PolyTrans-for-Director importer, .w3d 3D assets are imported into "Shockwave-3D" compatible cast members. The options shown on this portion of the dialog control how the .w3d file will be loaded into a new cast member:Load and Embed .w3d File Into Cast Member
The converted .w3d file will be loaded and embedded directly into the cast member. Thus, no disk files will ever be associated with the new Shockwave-3D asset in the movie.Virtually Link .w3d File on Disk to the Cast Member (Do Not Embed)
The converted .w3d file will be converted and saved to disk at the directory location shown on the dialog box ("Put .w3d files in this directory"). The new Shockwave-3D asset in the movie will link virtually to the .w3d file on disk. Thus, no .w3d file will be embedded into the movie. This is the default option. The default directory where the .w3d files will be stored is called "polytrans_created_w3d_files" and it is located in the main Adobe Director home directory.Resize Model to the Viewport Extents
If this checkbox is enabled (check-marked) then the camera is resized to encompass the entire imported model. The occurs after the source 3D data file has been imported but before the .w3d Director file has been written.Add Lights to Scene if None
If this checkbox is enabled (check-marked) then 2 point light sources will be added to the final scene. The lights are added in the front-left and front-right quadrants.Perform "Polygon Processing" On Model Before Exporting
If this checkbox is enabled (check-marked) then the converter will apply processing functions to the imported polygons just prior to the start of the .w3d file export process.These polygon processing functions allow polygon vertices to be welded together, normals unified, auto-smoothing to be performed and redundant coordinates to be deleted. For a technical description of each polygon processing function, press the Help button shown on that dialog box.
Also note that in most cases you will not have to use these functions since most of the import converters process their input data automatically (such as in the DXF and IGES readers) using these same polygon processing functions. Nevertheless, you can enable these functions if you want to fine tune the data before it is exported.
Compress Children Objects of Grouping Nodes to Single Object
This is a most useful batch conversion processing function, in particular when you are converting from a CAD-based file format (such as IGES, SolidWorks, Solid Edge, etc) and need to create the Director .w3d file with the least number of objects and an optimum hierarchy. This function collects together all objects situated under a "yellow" or "red" folder in PolyTrans/NuGraf (grouping nodes) into a single object. This can greatly reduce the number of objects in a scene prior to re-export. This is particularly true for CAD data which is often broken down into smaller sub-components (called faces) rather than transferred as whole objects. For a technical description of this function, press the Help button shown on its option dialog box.Hierarchy Optimizer # 1 and Hierarchy Optimizer # 2
These options provide methods to remove redundant hierarchy nodes from the current scene. In most cases you will not need to enable these options because (1) they are provided on some of the import converters already, or (2) they are provided in the "Compress Children Objects of Grouping Nodes to Single Object" option dialog box too, (3) most scenes don't need to have their nodal hierarchy optimized. Usually VRML and DirectX import benefit from enabling these options.Optimzier # 1 removes runs of empty folders, as well as folders with no children.
Optimizer # 2 is simpler, deleting empty folders which only have 1 geometry object in them. The second optimizer is useful if you batch import a file and find that there are a number of yellow folders (one per imported file) with one a single object in each folder.
Perform "Polygon Reduction" On Each Model
If this checkbox is enabled (check-marked) then the converter will apply the global polygon reduction algorithm to the imported polygons just prior to the start of the .w3d file export process. The algorithm allows the number of polygons in the scene to be greatly reduced. For a technical description of this function, press the Help button shown on its option dialog box.Apply Global Transformation to Exported Geometry
If this checkbox is enabled then a general purpose 4x4 transformation matrix will be applied to each exported .w3d scene, with specific limitations. This option will allow you to, for example, rotate all the exported scenes 90 degrees around one axis, or scale all the scenes uniformly by a specific amount. For a technical description of this function, press the Help button shown on its option dialog box.Create Backup File When Writing the .w3d Temporary File
This option allows the program to create a backup file if a file is about to be overwritten with a new version. For example, if the program is about to output a new file called "file.w3d" which already exists on disk then the program will first rename the current version to "file.bak" before writing the new version. If backup copies of the file already exist from previous executions of the translator program then the backup file extension will use sequential numbers (for example, " file.bk1", "file.bk2"). Thus, successive backups will use the file extensions: .bak, .bk2,. bk3, etc. If this option is not checkmarked then no backup files will be made.Modify Polygon Triangulation Options
Pressing this button will display the global options will control polygon triangulation. In those cases when a N-sided polygon must be converted to triangles, up to 3 different triangulation routines can be enabled inside the core Okino software. For a technical description of this function, press the Help button shown on its option dialog box.Modify Texture File Search Paths Directories
Pressing this button will display the file search paths dialog box. If you want to inform the core Okino software where your bitmap images are located (for automatic bitmap conversion), then press this button and add another file search path in the first tabbed dialog panel.
![[Geometry Processing Pipeline]](ioblock.gif)
As an alternative to using this plug-in, you can run the stand-alone PolyTrans or NuGraf software yourself and hand convert files between any Okino supported file format and the Shockwave-3D .w3d format. Inside Adobe Director can then import .w3d files via the File/Import menu. Both methods will produce the exact same results, although the PolyTrans-for-Director plug-in is more convenient to use.You can also write Shockwave-3D .w3d files from the PolyTrans-for-MAX and PolyTrans-for-Maya native plug-in systems
Director and Shockwave-3D are registered trademarks of Adobe Systems Inc.