

| You are here: Home » Import CAD Formats » NGRAIN's 3KO Solutions |
Support: 905-672-9328 Copyright © 2026 Okino Toronto, Ontario, Canada. |
|
The Renderware 2.x geometry export converter writes out the entire scene database as triangle meshes along with their associated material definitions that are defined in the converter's database. The converter can also automatically convert all referenced bitmaps (in the source 3D file) to a 2D bitmap format supported by Renderware.
The Renderware file written is an ASCII .rwx (version 2.0) file containing the 3D scene as a Renderware script. These files are typically used in conjunction with real-time 3D software developed by Criterion Software Ltd. (http://www.csl.com), namely the Renderware API and related software. Please note that this is for the Renderware 2.0 file format and not the 3.0 or newer games middle-ware systems.
Attributes exported to the Renderware file include (u,v) texture coordinates, vertex normals, surface materials and texture references. Hierarchy information in the source 3D database is preserved in the structure of the Renderware file.
A current limitation of the export filter is the lack of cameras and lights in the exported file. The Renderware scripting language does not have a mechanism to include cameras and lights. Also, since Renderware supports only a single texture map applied to any single polygon, only the first 2D texture applied to an object can be exported to the Renderware script. Procedural 3D textures are not supported.
It is important to note that all 2D bitmaps which are referenced by the exported Renderware script file should be in a location where the software making use of the file can find them. If the bitmaps cannot be located, an error may result while reading the script.
The following information explains the various options on the dialog box:
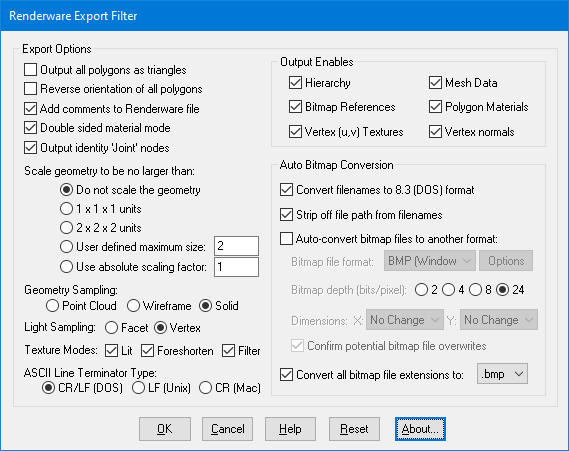
Export Options
Output All Polygons As Triangles
If this option is enabled (checkmarked) then all polygons that have 4 or more sides will be converted to triangles prior to output. Concave polygons and polygons with holes will be properly triangulated.Reverse Orientation of all Polygons
If this option is enabled (checkmarked) then the orientation of all polygons will be reversed (this will effectively swap the orientation of the polygons' geometric normals).Add Comments To Renderware File
If this option is enabled (checkmarked) then comments indicating object and material names as well as polygon indices will be output to the Renderware file.Double-sided Material Mode
If this option is enabled (checkmarked) then any materials output to the Renderware file will be flagged as double-sided materials.Scale Geometry to be no Large Than...
This option allows the geometry data to be automatically rescaled if it is too large. If set to 'Do not scale the geometry' then no scaling will be done. If set to '1x1x1 units' then all the objects will be scaled smaller should they exceed 1x1x1 units in total size. Likewise for the '2x2x2 units' option. If set to 'User defined maximum size' then the maximum size of all the objects can be set using the type-in numeric box.Although not quite the same, if the option is set to 'Use Absolute Scaling Factor' then all objects exported to the Renderware file will be scaled absolutely by the user-specified value. Thus, if you set the type-in value to 0.25 then all objects will be made 4 times smaller and if the value if set to 4 then all objects will be scaled 4 times larger. This is useful is you are converting a variety of different models to Renderware format and you want them all uniformly scaled with the same scaling factor.
Geometric Sampling
This set of three radio buttons determines whether the objects exported to the Renderware file should be flagged to be displayed as either point cloud, wireframe, or solid objects.Light Sampling
This pair of radio buttons selects whether the objects exported to the Renderware file should be flagged with facet or vertex light sampling. Vertex sampling uses the normal at each vertex when doing light calculations (which creates smoothed surfaces) while facet sampling uses the geometric normal of the polygons (which creates flat-shaded surfaces).Texture Modes
This group of checkboxes indicates which of the three texture modes should be enabled for textures output to the Renderware file. If 'Lit' is checked then the textures will be lit according to the light sampling of the material. If 'Foreshorten' is checked then the textures will be foreshortened in a perspectively correct manner. If 'Filter' is checked then the textures will be filtered in order to reduce pixelation caused by aliasing.Line Terminator Type
This common option selects which line terminator is to be used for the ASCII output file:
- Files destined for DOS/PC machines should use CR/LF,
- Files for UNIX machines should use LF, and
- Files for Macintosh machines should use CR.
The default is specific to which machine this converter is presently running on: CRLF for DOS/PC, LF for UNIX and CR for Macintosh. This option normally does not have to be specified unless you will be using the exported ASCII file on a different type of computer.
Output Enables
The check boxes inside the 'Output Enables' section control what type of data will be output to the Renderware file:Mesh Data
If this option is enabled (checkmarked) then all geometry currently defined in the 3d database will be output to the Renderware file.Materials
If this option is enabled (checkmarked) then all materials (surfaces) referenced by the current 3d database will be output to the Renderware file.Normals
If this option is enabled (checkmarked) then normals used by the polygon data will be output to the Renderware file. If this option is not enabled then the polygon data will appear faceted when it is rendered.Hierarchy Information
If this option is enabled (checkmarked) then the hierarchical relationship of objects in the scene will be recreated in the Renderware output file.(u,v) Texture Coordinates
If this option is enabled (checkmarked) then any (u,v) texture coordinates that are assigned to polygon vertices will be output to the Renderware file.Bitmap References
If this option is enabled (checkmarked) then texture bitmap references will be output to the Renderware file by any material that references any bitmap files.Auto Bitmap Conversion
Convert Filenames to 8.3 (DOS) Format
If this option is enabled (checkmarked) then the filenames for referenced bitmaps will be truncated to 8 character filenames with a 3 character extension. If naming conflicts arise as a result of truncating a long filename, then the filenames will be adjusted to eliminate the conflict.Strip Off File Path From Filenames
If this option is enabled (checkmarked) then all bitmap references within the exported scene will consist of a filename without a path. It is important to note that if this option is enabled the resulting script will likely result in an error when read unless the filenames referenced can be located by the software using the Renderware script file.Auto-Convert Bitmap Files to Another Format
If this option is enabled (checkmarked) then all 2d bitmap textures which are currently defined and referenced by the internal database scene will be automatically tagged then converted to a new user- specified 2d bitmap file format. For example, if you are converting a Lightwave scene to Renderware, and the Lightwave file references IFF bitmap files then this option can be enabled so that the IFF images get converted to BMP format automatically.The converted bitmap files will be placed in the same output directory as the converted .rwx file. If the texture(s) cannot be found in the location specified by the pathname prepended to the texture filename then the export converter will search for the texture(s) in all directories specified in the 'Default Search Path' and the 'Texture Bitmaps Search Path' file search paths (these can be modified by choosing the 'Preferences/Configure File Search Paths' menu item.
Bitmap Depth (Bits/Pixel): 2, 4, 8, 24
These radio buttons determine the number of bits/pixel to write out to the new 2d bitmap file. The default is 24 bits. A color quantization algorithm will be used for the 2, 4 and 8 bits/pixel output formats.Dimensions: X = #, Y = #
These two drop-down list boxes determine the X and Y resolution for the converted bitmap file(s):
No Change = Do not change the X or Y size Closest = Use the next highest power-of-2 size 2, 4, 8, ... 256, 512 = Choose a specific size for the X or Y dimension Confirm Potential Bitmap File Overwrites
If this checkbox is enabled (checkmarked) then the bitmap converter will confirm any potential overwrites of existing bitmap files on disk which have the same filename and extension as the one being written. If this option is disabled then no confirmation will be made.Convert all Bitmap File References To...
If the 'Auto-Convert Bitmap Files to Another Format' option is disabled then this option can be enabled. Rather than convert referenced bitmap images to another file format this option (when enabled) simply changes all the file extensions on bitmap files to a specific type. For example, if set to "BMP" then all bitmap filenames exported to the Renderware file will be changed so that their file extensions end in ".bmp". This is a useful option is you already have all of the referenced texture maps converted to the desired file format (either from a previous invocation of this export converter or by using a batch bitmap conversion program). If this option and the 'Auto-Convert Bitmap Files to Another Format' option is turned off then the filename extension will remain unmodified.