

| You are here: Home » Import CAD Formats » AutoCAD-Revit-Navisworks (DWF-3D) |
Support: 905-672-9328 Copyright © 2024 Okino Toronto, Ontario, Canada. |
|
Okino's mirror set of U3D import and export converter modules are two of the most well developed and feature rich converter modules available for handling U3D files. U3D files are most often associated with the 3D models which are embedded in Adobe® PDF files. U3D is also one of 4 preferred file formats by Okino to transfer data out of Bentley's Microstation (the choice of native DGN, STEP, U3D or VRML2 depends highly on the type of 3D geometric primitives used to create the Microstation scenes).
This import converter loads in files of the U3D file format, including meshes, materials, hierarchy, lights, cameras, animation, skeletons (bones) and skinned meshes. There are very few U3D file import converters, and of those very few if none import the range of data and options that this Okino U3D importer does.
Adobe, the Adobe logo, Acrobat, the Acrobat logo, and Reader are either registered trademarks or trademarks of Adobe Systems Incorporated in the United States and/or other countries.
- Mirror twin of the Okino U3D exporter. Both were written in tandem to provide the
first high quality bidirectional U3D conversion pipeline. Everything that can
be exported to U3D can be re-imported through the Okino U3D importer.
- Imports polygonal meshes with vertex normals, (u,v) texture coordinates and vertex colors. As well, 3D line sets and 3D point sets are supported.
- An industry first: excellent and robust support for U3D "skinned mesh" and skeleton import, which ties into the Okino Arctic toolkit. This allows PolyTrans to cross convert skinned mesh, animation and skeleton data between
U3D, 3ds Max, CINEMA 4D, Maya, Lightwave, DirectX, COLLADA and FBX file formats, with proper bone re-orientation, off-axis scaling removal, and so forth.
- Imports lights, cameras and their related parameters.
- Object, camera and light animation import, as well as hierarchy processing and import. Okino's Arctic toolkit provides the front-end to the U3D animation import system to ensure accurate and proper handling of all varieties of animation data formats.
- Extraction of embedded bitmap texture images to the TIFF file format.
- Material import including ambient/diffuse/specular/luminous colors, shading coefficients, associated texture maps, opacity, and Phong shininess.
- Import of "meta data" information on geometry, lights, cameras and material shader nodes as well as meta data information globally from the scene.
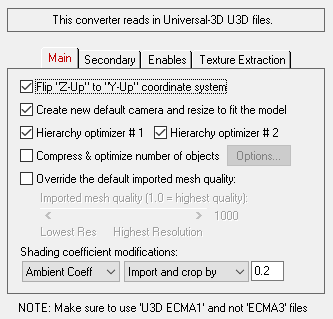
Flip "Z" up to "Y" up Coordinate System
Okino software uses a "Y" up coordinate system yet most U3D viewers have chosen to use a "Z" up coordinate system as default. Enabling this option (which is the default) will flip the source Z-up data of the U3D file to the natural Y-up coordinate system of the main Okino software.If you find that the data is oriented incorrectly after import then toggle this checkbox.
Create New Default Camera and Resize to Fit the Model
If this checkbox is enabled then a brand new Okino-specific 3D perspective camera will be created and made the "default" camera. The camera will be arbitrarily zoomed out to view the entire imported U3D model. This new camera will not have any relation to the cameras contained in the source U3D file. If this option is disabled then no new 3D perspective camera will be created.Hierarchy Optimizer # 1, Hierarchy Optimizer # 1
These options provide methods to remove redundant hierarchy nodes ("NULLs", or grouping folders) from the imported file. Optimizer #1 removes runs of empty folders, as well as folders with no children. Optimizer #2 is simpler, deleting empty folders which only have 1 geometry object in them. These options can also be enabled via the "Optimize hierarchy after completion" checkbox found on the options dialog box of the "Compress & optimize number of objects" option (see below).Compress & Optimize Number of Objects
This checkbox enables one of the most important and critical scene processing functions in all of Okino software. It is an integral and core part of any Okino CAD importer, and it has been added to the U3D importer for added benefits.The primary purpose of this function is to walk the imported geometry hierarchy and compress together all objects that are parented under a single folder into a one new object. For example, if you import a U3D file and find that 200 polygonal objects are grouped under one folder, then enabling this option will cause all such occurrences to collapse the children geometry of each grouping folder into one object.
The documentation for this option can be viewed by pressing the "Options" button and then the "Help" button on the optimizer's dialog box.
Continuous Level of Detail for Imported Meshes
U3D mesh data is made available in a format called "Continuous level of detail". This means that the data can be imported in any resolution, from a very low number of polygons to the original high resolution mesh stored inside the U3D file. Reducing this slider to the left will import fewer polygons per mesh (lower resolution).Shading Coefficient Modifications
See below for a longer explanation of these combo boxes. In general, these combo boxes allow the key material attributes to be tweaked during import. This might be necessary, for example, if the imported objects appear too ambient, or too luminous.
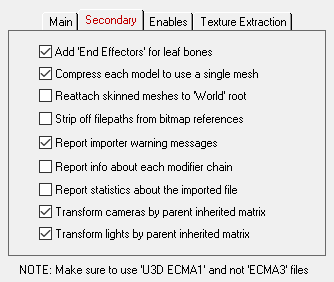
Add 'End Effectors' for leaf bones
Okino software uses the concept of skeletons being defined by bones connected between 2 "joints". U3D uses the pure concept of just bones and no joints. The last bone in a bone chain (a "nub" bone) will require that a new joint be added at the end of the bone chain for it to be visualized in Okino software. Enabling this option will add another joint node at the end of the imported bone chain so that the last nub bone can be visualized properly.Compress Each Model to use Single Mesh
The U3D file format is a little bit unusual by the fact that each polygon mesh can only be assigned one material (no materials-per-polygon assignments are allowed). Because of this an object which has multiple materials assigned to it in another file format has to be exploded into multiple meshes inside the U3D 'modifier chain', with each mesh assigned a different material.If this option is enabled then the import converter will attempt to recombine the multiple meshes back into a single mesh, thus making the final imported model appear structurally similar to the model in the source 3D file format or program). If the option is disabled then each mesh will become its own object after the import process is completed.
Reattach Skinned Meshes to 'World' Root Node
This option solves problems when importing skinned meshes (meshes with bones) which have animation and/or hierarchical transformations on them. Normally a skinned mesh is transformed only by its corresponding skeleton. But there are cases where a skinned mesh may be located within a hierarchy which has animation or other transformations above it in the hierarchy. In such cases it is sometimes better to move the skinned mesh out of the hierarchy up to the top-most "world" root node so that no other transformations affect it.Strip off File Paths from Bitmap References
If this option is disabled then absolute filepaths will be stripped off from the bitmap references, else the file paths will remain unmodified.Report importer warning messages
If this checkbox is check-marked then warning messages will be displayed during the parsing phase.Report info about each modifier chain
This is a debugging option. If enabled then information about each modifier assigned to the model nodes (instances of the raw geometry) will be printed out to the message window.Report Statistics About the Geometry File
If this checkbox is check-marked then parsing statistics will be displayed in the message window after the U3D file has been imported.Transform cameras by parent inherited matrix
If this checkbox is check-marked then each imported camera's location will be transformed by the parent model node it is attached to. This is the default. If this checkbox is disabled then the camera will not be transformed to the location of its hierarchical parent and a warning message will be reported.Transform lights by parent inherited matrix
If this checkbox is check-marked then each imported light's location will be transformed by the parent model node it is attached to. This is the default. If this checkbox is disabled then the light will not be transformed to the location of its hierarchical parent and a warning message will be reported.
This dialog box controls what entities will be imported from the U3D file.
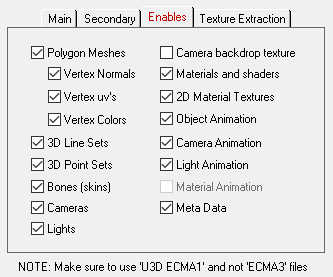
Polygon Meshes
If checkmarked, then load in all of the polygon mesh geometry (triangle or polygon lists). You can also selectively specific portions of the mesh to load:
- Vertex Normals - Load in vertex normals.
- Vertex Texture uv's - Load in texture uv vertex coordinates.
- Vertex Colors - Load in vertex colors.
3D Line Sets
If checkmarked, then load in the 3D polylines from the U3D scene file. Polyline are not the same as polygons. They have no area and cannot be raytraced or scanline renderer.3D Point Sets (Point Clouds)
If checkmarked, then load in the 3D point sets (point cloud data) from the U3D scene file.Bones (skins)
"Mesh skinning" is the process of deforming a single skin mesh with a skeleton of bones. The contribution of each bone of the skeleton to the deformation of a vertex in the mesh is controlled by vertex weights. If this option is enabled then a mesh will be bound to one of more bone nodes via transformation matrices and weight values.Cameras
If checkmarked, then load in the camera definitions from the U3D scene file.Lights
If checkmarked, then load in the lights.Camera Backdrop Textures
If checkmarked, then load in the texture map which optionally is assigned as a background for each camera view.Materials and Shaders
If checkmarked, then load in the materials.2D Material Textures
If checkmarked, then load in the textures that are referenced by a U3D material.Object Animation
If checkmarked, object animation is imported from the U3D file. U3D uses rather simple animation methods. All interpolation is done as LINEAR in U3D file and each key is forced to have XYZ values for scale, rotation and translation (separate keyframe lists are not possible in U3D).Camera Animation
If checkmarked, camera animation is imported from the U3D file. Field-of-view animation is not supported by U3D files.Light Animation
If checkmarked, light animation is imported from the U3D file.Material Animation
This option is currently disabled because the U3D file format does not have material animation capabilities.Meta Data
If checkmarked, meta data is imported from the U3D file from each node. For geometry, meta data is imported from both the resource (generator) node as well as the model node (the instance of the generator).
The U3D file format allows texture maps to be embedded directly inside the U3D files. This dialog box describes how those texture maps will be extracted and converted back to TIFF files on disk.
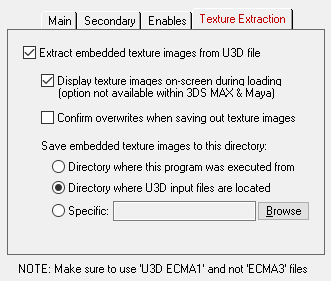
Extract embedded texture images from U3D file
If this option is enabled then the texture maps embedded in the U3D file will be extracted to disk as TIFF images.Display texture images on-screen during loading
Enabling this option will cause the embedded texture maps within the U3D file to be displayed onscreen during the import process (this does not apply when the U3D file is being loaded into 3ds Max or Maya).Confirm overwrites when saving out texture images
If this option is enabled then you will be prompted whether an existing TIFF file on disk should be overwritten.Save embedded texture images to this directory:
This option defines where the extracted TIFF texture maps will be written to disk.
Directory where this program was executed from
The extracted TIFF images will be saved in the directory where this program began execution (which is usually the same as where this program is located on disk). This is not a preferrable option since this directory will eventually become cluttered with TIFF images extracted from StudioPro files.Directory where U3D input files are located
The extracted TIFF images will be saved in the same directory where the Strata StudioPro input file was read from. This is the default but in general you should store the TIFF files in a common textures directory.Specific:
The extracted TIFF images will be saved in the directory indicated by the type-in edit box. If no directory is shown, or you want to change the current output directory, then the Browse button can be pressed to select the desired destination directory.
These combo boxes provide hands-on control over how imported material shading parameters should be modified so that the imported model can be rendered nicely in a photo-realistic rendering program. All too often the imported model appears "too diffuse" resulting in rendered images that are washed out or with no gradual shading effects visible. The two combo boxes and the single numeric type-in box provide you good control over the diffuse, specular and luminous shading coefficients imported into PolyTrans/NuGraf, as well as the opacity of the material and Phong shininess value.The first drop-down combo box selects which of these shading parameters you want to modify. Each shading coefficient has its own operation which can be selected (the second combo box) and an optional numeric type-in value (the third data entry text input). The following describes the various shading parameters that can be controlled:
- Diffuse Coefficient: This controls the amount of color reflected from an object based on the direct light shining on it. A good default value is 0.4 and ideally ranges from 0.0 to 1.0. Some programs have a diffuse shading coefficient parameter (NuGraf/PolyTrans, etc) while others do not (3D Studio). If an export file format does not support a diffuse shading coefficient then this value will be multiplied into the diffuse shading color itself.
- Specular Coefficient: This controls the intensity of the highlight color on an object. A good default value is 0.7 and ideally ranges from 0.0 to 5.0. If an export file format does not support a specular shading coefficient then this value will be multiplied into the specular shading color itself.
- Luminous Coefficient: This controls how much color is added directly to an object, irrespective of any light which shines on it (the higher the value, the more the object will appear to glow). In general you should keep this value at 0. If an export file format does not support a luminous shading coefficient then this value will be multiplied into the luminous shading color itself.
- Opacity: This is the inverse of transparency. 0.0 will make the object fully transparent, while at 1.0 the object will be fully opaque.
- Phong Shininess: This controls the width of the specular highlight seen on an object. An ideal range is 6 (very wide) to 300 (very narrow). The default is 32.
For each material shading parameter, several actions can be performed on it during the import process:
- Do Not Import: The shading parameter is not imported at all. No value is imported nor sent to PolyTrans/NuGraf. Thus, the default material shading parameter value (as set inside PolyTrans/NuGraf) will be used instead.
- Import Unchanged: The shading parameter is imported as is, with no change.
- Set and Use Default: The shading parameter is set to some "good" default value (as determined by the import converter). This default value will be shown in the type-in box.
- Set to Specific Value: The imported shading parameter will be overridden with the user specified value of the numeric type-in box.
- Import and Crop by: The shading parameter is imported and will remain unchanged if it is less than the numeric type-in value shown on the dialog box. If it is greater, then the imported value will be clamped to be no greater than the numeric type-in value. This is a good operation, for example, if you do not wish for the ambient shading coefficient to be greater than 0.3.
- Import and Scale by: The shading parameter is imported and multiplied by the numeric type-in value shown on the dialog box
- Normalize Color and Coefficient: This option only applies for the ambient, diffuse, specular and luminous shading coefficients and their respective RGB colors. This option is a hybrid approach which tries to automatically "guess" at a proper shading coefficient value given the raw (and corresponding) color imported from the file. As mentioned, the shading coefficient is needed to create nice looking (nicely shaded) images in a photo- realistic rendering program. If this option is chosen, then the specific shading coefficient will be derived directly from the relative intensity of the imported color which corresponds to this shading coefficient (diffuse color for diffuse shading coefficient etc.). For example, if the imported diffuse color is (0.4, 0, 0), which is 40% of full-bright red, then the diffuse shading coefficient will be set to 0.4 and the diffuse color will be modified to be (1, 0, 0). When the new color (1,0,0) and the new shading coefficient (0.4) are multiplied together, it results in the original color imported from the file (0.4, 0, 0). In general you may wish to use the "Set and Use Default" option to get good rendered results.