

| You are here: Home » Specialized Sections |
Support: 905-672-9328 Copyright © 2024 Okino Toronto, Ontario, Canada. |

Simple Introduction to Polygon Reduction: Reducing a Cow
![]()
![]()
![]()
Synopsis
This is the simplest tutorial in a series which shows how to apply polygon reduction to a cow model.
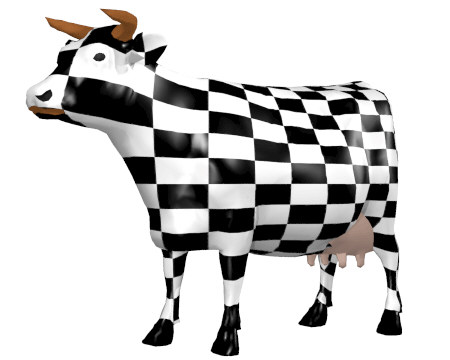
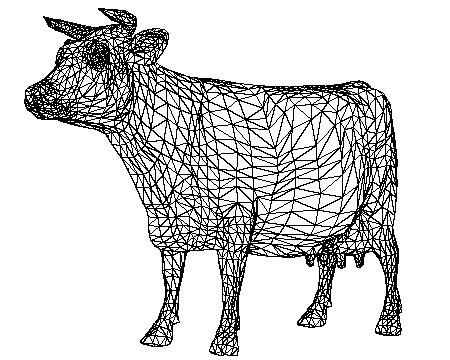
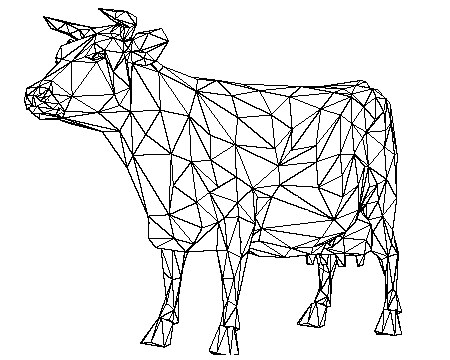
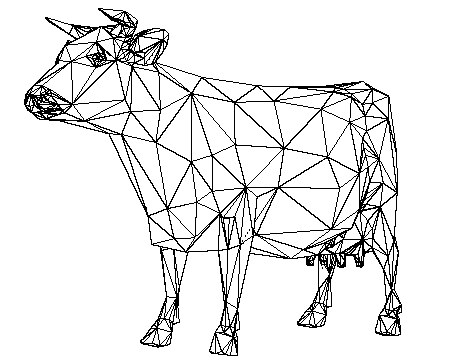
Polygon reduction is a mathematical technique whereby the number of polygons in an object can be reduced without significantly reducing the quality of the resulting model. For this tutorial we wish to reduce the number of polygons in this cow object which originally has 5804 triangles:
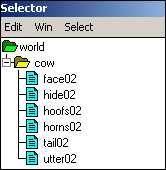
The cow model originally was imported as a series of distinct parts, as shown in this screen snapshot of the Selector Window:
To start the polygon reduction algorithm on this object, select one of these common starting methods:
§ Right click on the "cow" yellow folder, shown above, and select the "Polygon reduction" menu option, or
§ Select the "Okino Polygon Reduction/Apply to all objects in scene" menu item from the main menu, or
§ Left click on the "cow" yellow folder, shown above, so that all sub-objects of the cow become selected. Now select the "Okino Polygon Reduction/Apply to selected instances only" menu item from the main menu.
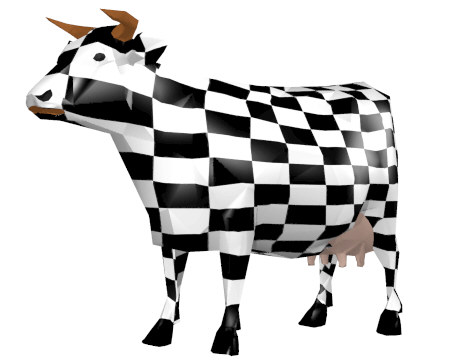
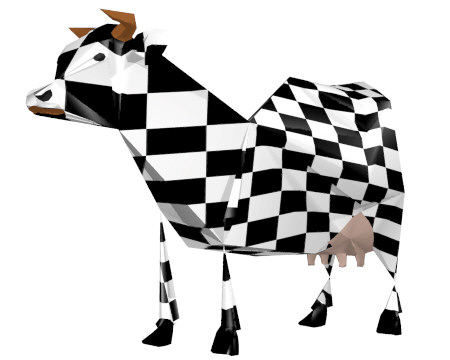
The polygon reduction options dialog box will appear next. Press the "Reset" button to reset all the options to their default values. To make a quick test reduction, press the "Reduce!" button right away. This removes 80% of the polygons, leaving 1154 triangles:
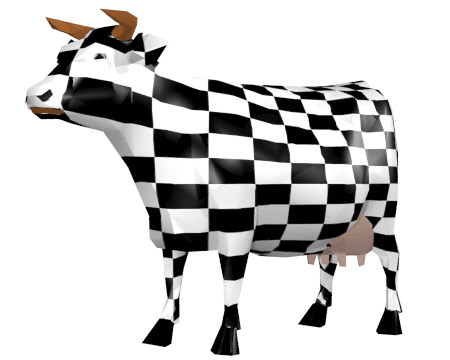
This looks fairly close to the original model except that the outline of the eyes have become smaller in size. This problem will be fixed further into this tutorial. Notice that the reduction algorithm has also maintained the overall texture mapping quality even though 80% of the underlying polygons have been removed.
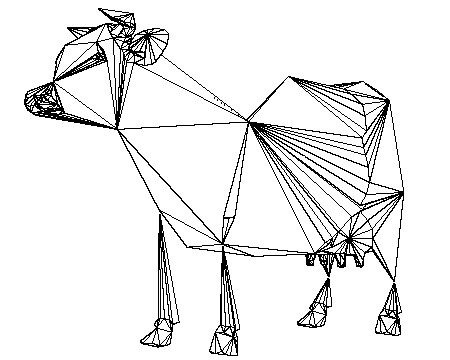
As explained throughout all of the polygon reduction tutorials, performing polygon reduction on multiple objects which are not pre-welded together can lead to cracking and holes in the final model. If we re-load the cow model, perform 85% reduction and look at the cow's rear end we will find such cracking:
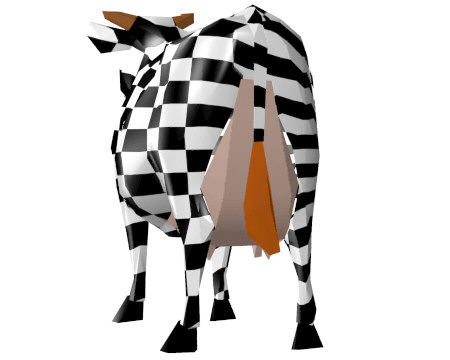
Notice the gaps in the udder area, between the checkered sides and the brownish back part. These cracks are caused because the polygon reduction algorithm reduces each sub-part of the cow (face, hide, hoofs, horns, tail and utter) individually and not as a whole.
Before we go and weld the entire cow into one object let's try enabling the "Lock the vertex positions of vertices on mesh borders" option on the "Weightings" panel of the options dialog box. This will prevent any vertices located on mesh borders from being relocated during the polygon reduction stage. We do not want the vertices around the udder area from moving. Be forewarned that this option can lead to bad warping of the model if a very high polygon percentage reduction is chosen (see the last image in this tutorial). We re-loading the model, setting this option on, and using 85% reduction we arrive at this new model:
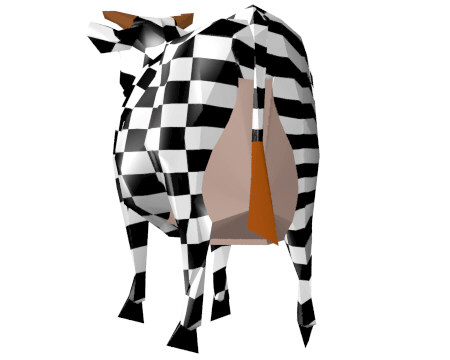
Notice that the cracks are now gone around the udder area. The "Lock the vertex positions of vertices on mesh borders" is one possible way to prevent such cracking from occurring. However, the most favored way is to combine all of the sub-objects that compose the cow into a single object. By doing so the polygon reduction algorithm will be able to reduce the single model as whole and take into account adjacent polygons so that cracks do not appear.
To move the 6 sub-objects of the cow into a single object, do one of the following:
§ Right click on the "cow" yellow folder and select the "Move child instances into a single object" popup menu item and then click on the "Start!" button on the dialog box which appears next, or
§ Left click on the "cow" yellow folder so that the car mesh turns red in the view windows (you can use the normal selection process to select whatever objects you want moved into a single object). Now, pick the "Move Selected Objects to New Object" item from the main menus and press the "Start!" button on the dialog box which appears next.
Next, right click on the new single object in the Selector Window and choose the "Polygon reduction" menu option. Press the "Reset" button on the polygon reduction options dialog box and change the reduction percentage to 75%.
In an example above we mentioned that the outline of the eye had become smaller. This was because the eyes and head were in two different objects and they were reduced irrespective of each other. For our new single object we wish to enable the "Lock the vertex positions bordering two materials" option on the "Weightings" panel of the options dialog box (note: this is different than the other similar option used above). The eye and head use two different materials, so enabling this option will ensure that vertices that border these two different materials will not become relocated during the polygon reduction algorithm.
And as expected we do get better quality by welding the sub-objects into a single object and also by enabling the "Lock the vertex positions bordering two materials" option. In general you will not want to enable the "Lock the vertex positions " checkboxes unless you absolutely need them; these options can lead to serious object warping if the percentage reduction amount is too high.
As an example, how bad can the polygon reduction actually get if all the options are haphazardly enabled? The following option has the two "Lock the vertex positions " checkboxes of the "Weightings" panel of the options dialog box enabled, and the polygon reduction percentage has been set to 100%, resulting in the final model:
Why has this warping occurred? By enabling the two "Lock the vertex positions " checkboxes you have asked the polygon reduction algorithm not to move many of the vertices in the model. It is also told that you want a very high level of polygon reduction (100%). Basically the reduction algorithm has few degrees of freedom to work with (it's hands are tied, so to speak) and will begin to move vertices that otherwise should not be touched. This leads to horrible warping. Is this a bug? No, it is the result of asking the polygon reduction algorithm to perform a miracle which it can't do.
Seeing this horrible warped model, what should be done if such cases are encountered? The answer is simple, just reduce the percentage of polygon reduction required. In the above models 75% produced quite acceptable results, but moving up to 77% or more with either of the "Lock the vertex positions " checkboxes enabled produced bad warping. Thus, there is an ideal "break point" at which the model just can't be reduced any more before introducing warping effects. Not every model can be reduced to the same high percentage and still produce high quality results. If a model starts with an overabundance of polygons then 95% reduction might be possible with great results. On the other hand, a model that is already highly optimized might not even reduce well if asked to remove 50% of its polygons. We have found that most models that we tested could be reduced between 75% and 90% without losing overall visual fidelity.