

| You are here: Home » Specialized Sections |
Support: 905-672-9328 Copyright © 2026 Okino Toronto, Ontario, Canada. |

Performing Polygon Reduction on a Car Model
![]()
![]()
![]()
Synopsis
This tutorial shows how various options on the options dialog box can affect the quality of a reduced model. In this tutorial we will perform polygon reduction on the "57 Chevy" model which has been an in-house standard at Okino for many years.
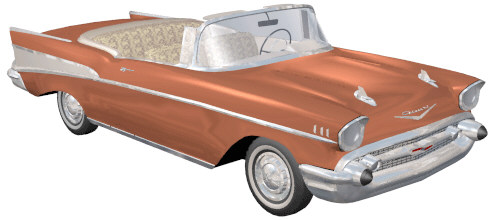
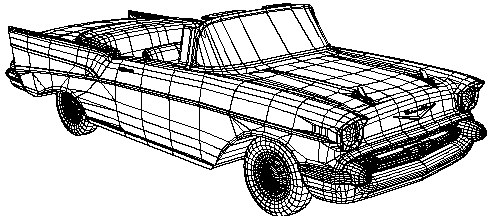
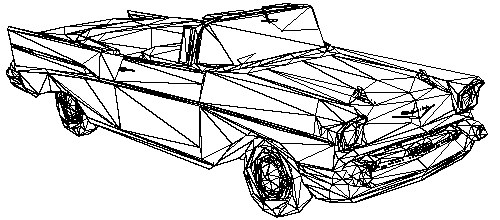
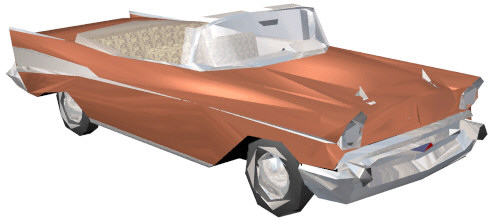
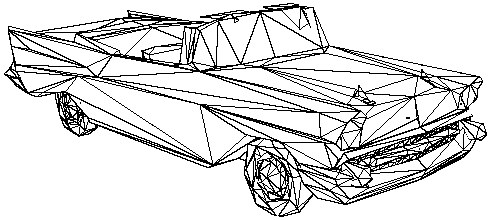
Our initial scene is the "57 Chevy" model, originally released by Viewpoint Datalabs for general public usage. It consists of 29759 triangles and 45 objects. The following image shows the original object with shading and with hidden lines removed. Notice the high number of polygons on the tires and in the front bumper region.
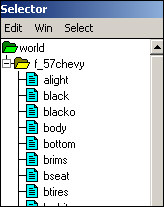
Our scene consists of 45 distinct objects. Without knowing any better, we might want to apply the polygon reduction algorithm to each object of the car one by one. To do this, we can right click on the "f_57chevy" yellow folder, shown below, and select the "Polygon reduction" menu option.
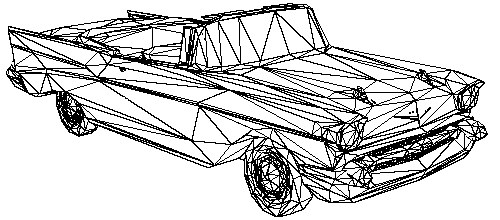
After the options dialog box shows up, press the "Reset" button, set the "Polygon Reduction Amount" slider to 86% and then click on the "Reduce!" button. This results in a model of 4126 polygons, 86% compression:
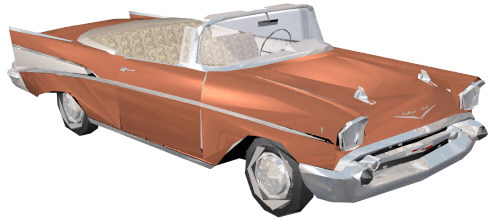
This rendering above shows the side effects of blindly reducing a model that is made up of multiple parts but which should appear as a series of smooth connected panels. Note that the white walls of the tires have become very chunky and black spots have appeared in the car panels.
To amplify this problem for the sake of this tutorial let's increase the polygon reduction amount to 94%. We will reload the original car model from disk and perform the reduction process once again, as described above but this time with the "Polygon Reduction Amount" slider set to 94%. This results in the following model (1669 polygons):

This clearly shows that reducing the 45 objects irrespective of each other does not lead to good polygon reduction results. The problem is that the 45 objects need to be welded together into a single object before reduction begins. By welding into a single object the polygon reduction algorithm can keep adjacent surfaces "glued" together so that holes do not appear in the car panels and white walls of the tires.
In the next few tests we will weld the 45 objects into a single object prior to reduction. To move the 45 objects into a single object, do one of the following:
§ Right click on the "f_57chevy" yellow folder and select the "Move child instances into a single object" popup menu item and then click on the "Start!" button on the dialog box which appears next, or
§ Left click on the "f_57chevy" yellow folder so that the car mesh turns red in the view windows (you can use the normal selection process to select whatever objects you want moved into a single object). Now, pick the "Move Selected Objects to New Object" item from the main menus and press the "Start!" button on the dialog box which appears next.
Save this new single object scene to disk using the Okino .bdf file format (from the File main menu, Save-As). Call it by another name on disk, such as "57Chevy_Single_Object.bdf".
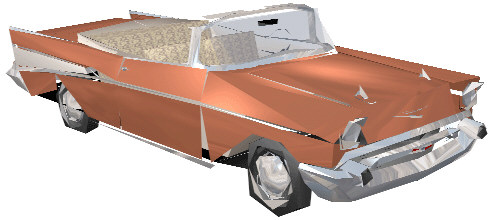
Now that we have a single object created, right click on the new single object and select "Polygon reduction" again. For the following test use 86% reduction. The resulting model has 4151 polygons are shown here:
Now this is much better! By welding all the 45 objects into a single object the polygon reduction algorithm can keep adjacent surfaces together, thus reducing or preventing serious cracks or holes from appearing.
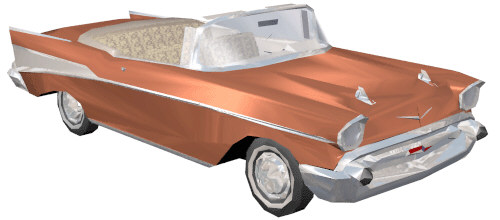
Now let's reload the single model again ("57Chevy_Single_Object.bdf") and perform reduction at 94% to compare with the multi-object version above. This results in a model of 1710 polygons:
Again, this looks much better than in the previous version shown above. The white walls of the tires have started to become chunky but that is to be expected at this very high level of polygon reduction.
One of the most important lessons that should be learnt from this tutorial is that "every model has a break point at which its quality will only degrade further and further as the percentage of reduction is increased". Say a model has 10,000 polygons and 7,000 of them are redundant. Thus, removing 70% of the polygons will do little to affect the quality of the object. As we increase the reduction further, say to 90%, the important polygons which help define the overall shape of the original object must be removed to achieve the 90% reduction amount; this will only lead to worse quality. Keep this in mind because you might want to take a 1000 polygon model and reduce it 95% hoping to keep the same quality - this may not be possible if the original 1000 polygon model had few redundant polygons; any reduction under 1000 polygons may remove important polygon data and this lead to worse quality.
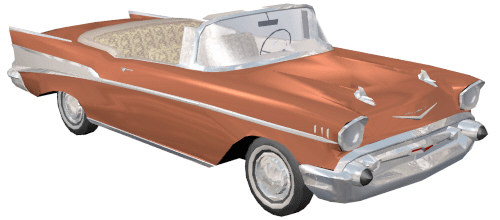
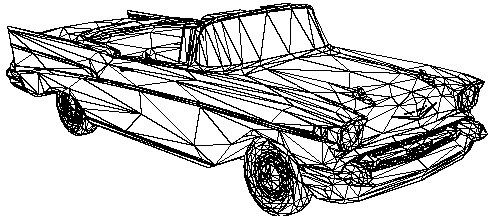
By experimenting with the reduction percentage, we found that 75% reduction seemed to be this magical "break point" for the 57 Chevy model. At 75% the model appears to be fairly identical to the original model. This is shown in the following images for 75% reduction, 7457 polygons:
In closing:
§ This tutorial has shown that a "break point" exists at which a model's quality starts to degrade as the percentage of polygon reduction is increased. Keep in mind that many people use polygon reduction to create LOD objects (level of detail) for which quality is not important because the model is viewer from a distance. Thus, you can either use the Okino polygon reducer to reduce the object to its "break point" and keep the same quality, or push the percentage reduction up high (95%) to get severe reduction at the cost of decreased model quality.
§ This tutorial has also shown that welding a multi-object model into a single object produces better results which these multi-objects form single surfaces (such as the car body, tires or front grill).